Last Updated on June 13, 2025 by James Dziezynski
Borah Peak is the highest point in Idaho. It’s also an exciting climb along its primary route, the aptly named Chicken-Out Ridge. This guide will give you all the necessary info so you do not chicken out on this venerable state highpoint.
Borah Peak Hike Stats At-A-Glance
- Distance – 8.0 miles round-trip Via Chicken-Out Ridge
- Difficulty – Class 4
- Time – 6 – 9 hours round-trip
- Elevation Gain – 5,500’
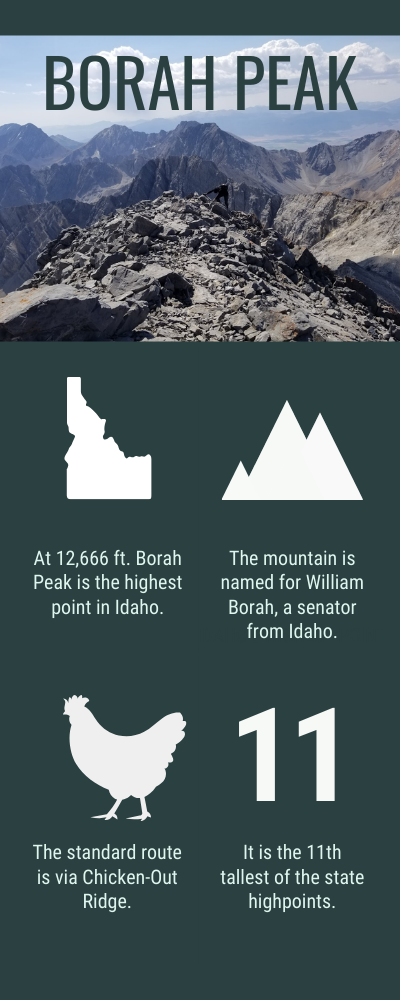
- Summit Elevation – 12,666’
- Best Time to Climb – Late summer / early autumn
- Location – Lost River Range
- Download GPX Track
Some maps call it Mount Borah. Some call it Borah Peak. Just don’t call it late for dinner?
Idaho’s 12,662’ Borah Peak is one of the most exciting state highpoints—and definitely in the top ten in terms of difficulty. I put it at #6, behind Alaska, Wyoming, Montana, Washington, and Oregon. Along with Mount Hood, it’s the toughest of the highpoints that are normally done as single-day hikes. There are a lot of write-ups about hiking Borah Peak and there are a lot of opinions on how challenging Chicken-Out Ridge really is. Here are my thoughts.
 Climbing Borah Peak 101
 Climbing Borah Peak 101
👉 The standard route on Borah Peak is Chicken-Out Ridge. After a steep on-trail approach, this route is mostly a mix of Class 2 / 3 but has two crux sections that are absolutely Class 4—albeit very brief Class 4. That makes these sections “no-fall zones”.
Mountaineering: Freedom of the Hills (7th Edition, page 550) describes Class 4 as “Simple climbing, often with exposure. A rope is often used. A fall on Class-4 rock could be fatal. Typically, natural protection can be easily found.” Since hiking/climbing routes are rated by their toughest move, I have no qualms about calling this a Class 4 outing.
👉 I didn’t bring a rope but it’s completely reasonable to do so, mostly for the second crux. This involves downclimbing a 20-foot tower with excellent holds. A bulge of rock at the top means you’ll need some guts to make the first few moves. Setting up a quick belay here is easy and prudent.
👉 The time estimation of 6 – 9 hours is a broad range, but it is right. The speed of your climb will be determined by your fitness in grinding up the trail up to the ridge and how confident you are in your route finding along the ridge. I can’t help with your fitness, but I do hope this guide saves you time with navigation.
My aim is to describe the path of least resistance to the summit. Hiking in late August or early September gives you a good chance of avoiding a notorious snow bridge section that does eventually melt out. I hiked it on Sept 7, 2018, and there was no snow, though my team did have crampons in our packs if needed.
Borah Peak FAQS

The second crux on the Chicken Out Ridge. It’s smooth sailing after this!
Before we get to our guide, let’s start with some of the basics.
Q: How long does it take to climb Borah Peak?
6 – 9 hours.
Why such a large time range? The hike begins with steep, on-trail terrain which favors fit hikers used to big vertical elevation gain. The second half is the ridge itself, which requires exposed scrambling, climbing, and route finding. Experienced hikers/climbers who are skilled at both aspects of fitness and route finding will find this an excellent combo. Note that if you’re adding in ropes/gear, the hike time can increase.
Q: How tall is Borah Peak?
As of 2024, LiDar measurements have the peak at 12,666 ft.—4 feet taller than previous estimates.
Q: Is Mount Borah a hard hike?
Yes.
For experienced mountain hikers, it’s not an exceptionally tough endeavor but requires good fitness and scrambling ability.
Because the prelude hike to the ridge is steep, pacing your approach is important. The ridge itself requires savvy route finding, a few gutsy Class 4 moves, and, of course, you have to repeat it all to get back. The rock is generally very solid, and the difficult sections are brief. The most difficult parts of the hike for many people will be the exposure at the first crux and the face-in downclimb of the second crux.
Q: When should I climb Borah?
Early September seems to be a sweet spot. The weather is cool, the crowds should be lower than in August (the most popular month) and the snow bridges should be melted out. However, if you enjoy a little ice and snow underfoot, the peak is reasonably “in-season” starting mid-June.
Q: Is Borah Peak Technical?
The answer here is: sort of. Early season hikes (May – June) may require crampons and an ice axe. Bringing a rope isn’t an unreasonable move, assuming you and your teammates can efficiently set up anchors, though it will come at the expense of overall time. A helmet is a good investment, especially if the peak will be crowded—you’re more likely to get bonked by a rock kicked down by another person than anything else. That said, our team didn’t bring helmets as the majority of the hike is on the spine of a ridge.
Most climbers don’t bring gear as the Class 3/4 terrain is brief, solid, and quickly bypassed.
Logistics
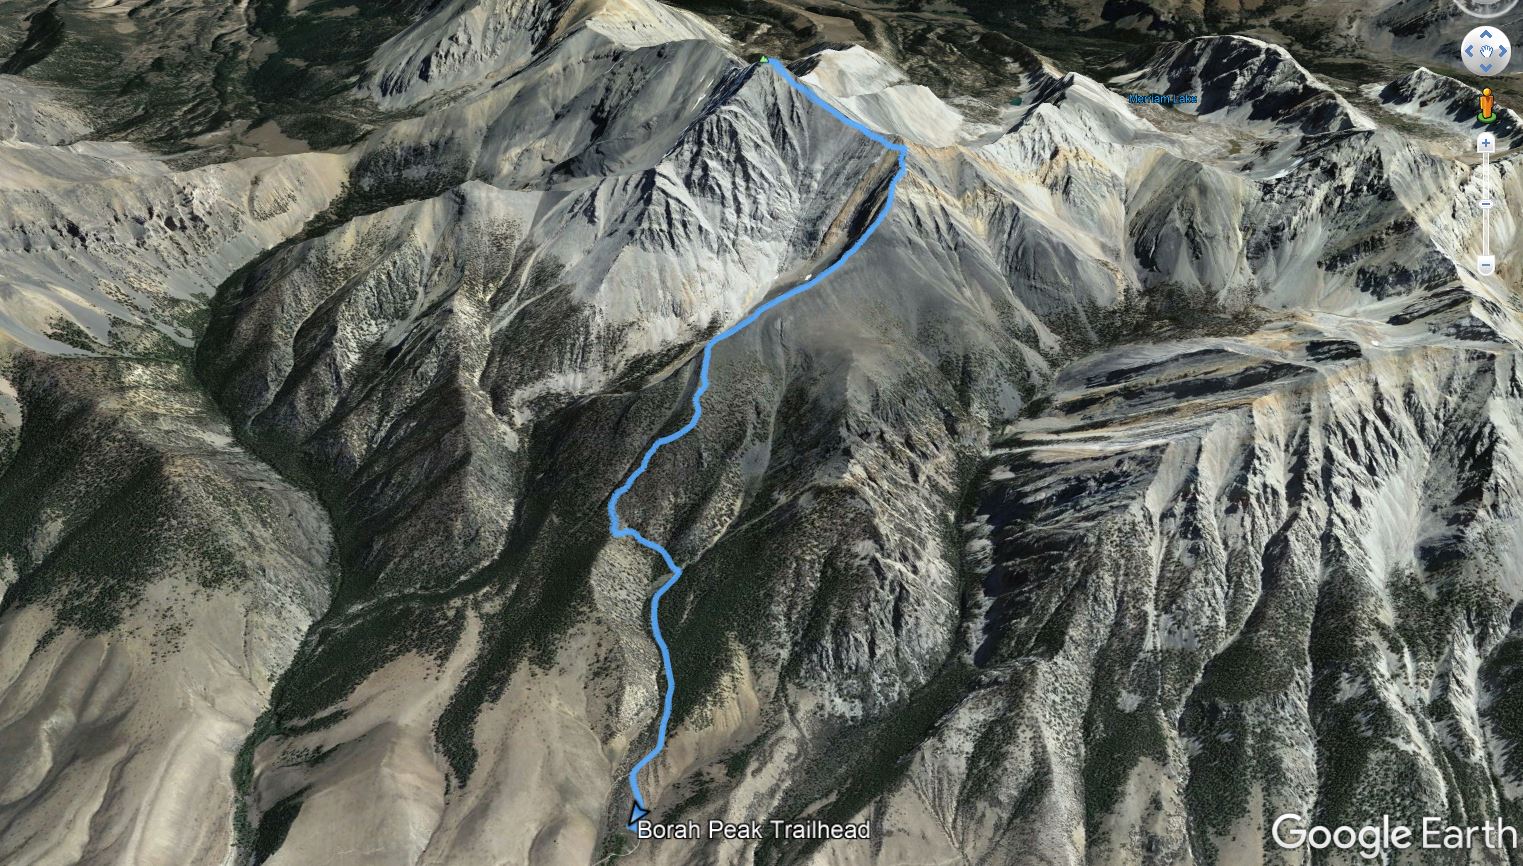
Google Earth look at the Chicken-Out Ridge Route on Borah Peak.
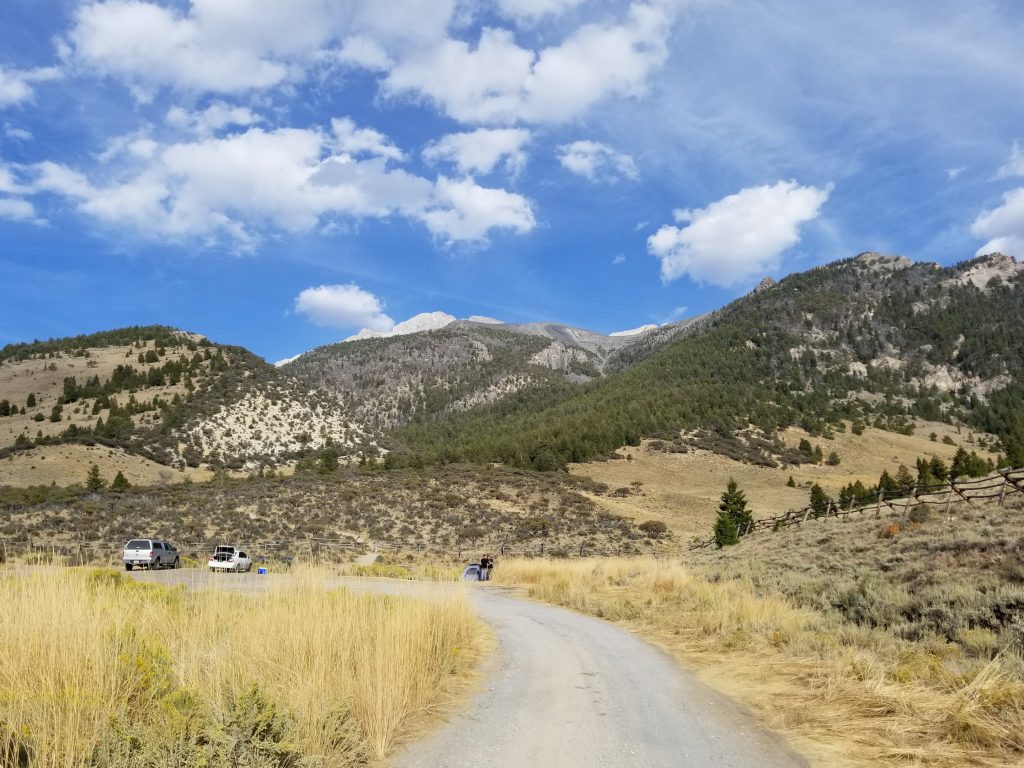
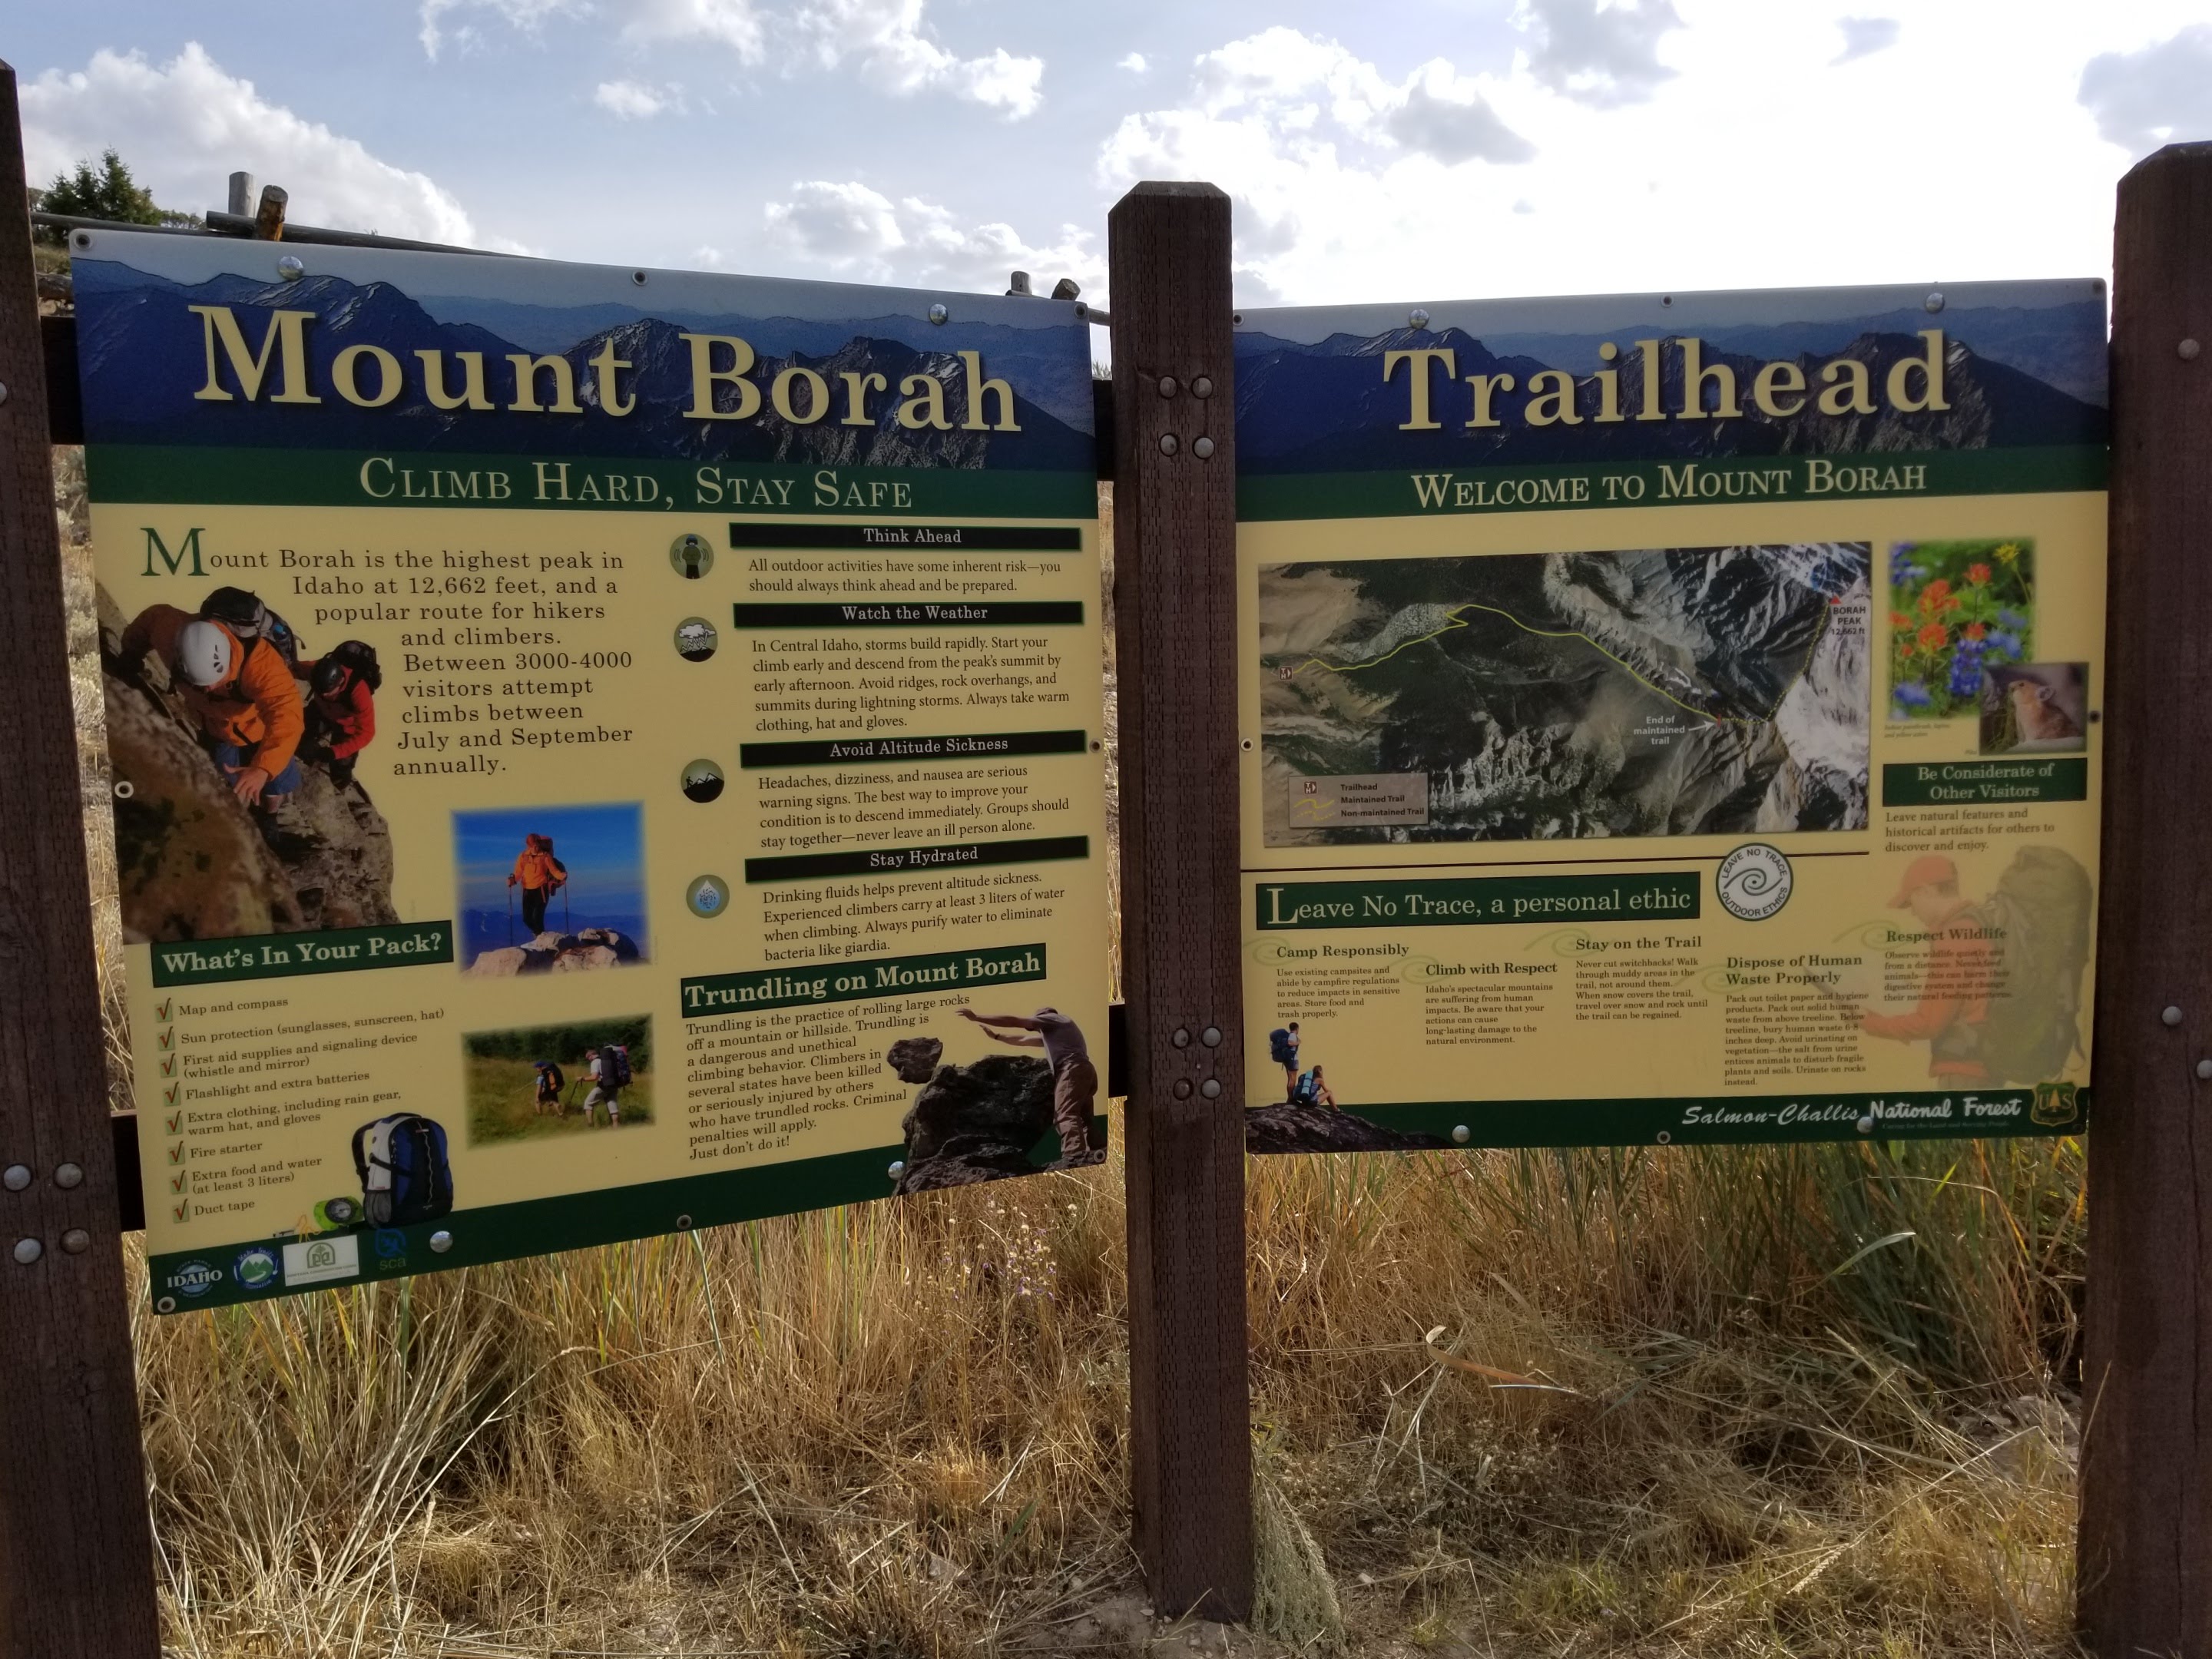
Reaching the Borah Peak Trailhead is very straightforward (see Getting There below for directions). The trailhead itself has 5 designated camping spots ($5 a night as of 2022) and plenty of space for pitching a tent in the two large parking areas if the designated sites are full. Passenger cars can reach the parking lot no problem—Birch Springs Road is a well-maintained dirt road.
Coming from Colorado, we debated driving (about 13 hours each way) or flying (about 1 hour 45 minutes each way). We opted to fly from Denver > Boise because flights were under $200 per person. If you fly, bear in mind you’ll be bringing camping gear so factor that into your bag check cost. The Boise Airport has car rental options directly from the terminals.
The drive from Boise to the Borah Peak Trailhead on Birch Springs Road takes about 4 hours via the southern route, where roads are flat and easy to navigate. Mackay is the closest town to the trailhead, about 25 minutes away. Making a loop north back to Boise is a great way to have an awesome road trip after Borah and is described in the Post-Hike Ideas section. Note that en route from Boise to Borah Peak, you’ll pass Craters of the Moon National Monument, a place where lava flows have transformed the land into a bizarre moonscape—it’s worth a quick visit if you have the time.
When you arrive at the trailhead, the elevation is 7,400’. If you’re coming from sea level, it may be worth spending an extra day acclimating so that you’ll feel strong at 12,000’. Craters of the Moon is about 5,500’, so one night there, followed by a night at the trailhead is a solid flatlander strategy. Those coming from elevations of 5,000’ or higher should acclimate without any trouble, but always be aware of the symptoms of altitude sickness and listen to your body.
Gear
If you value the cartilage in your knees, you’ll want to bring poles.
-
- Footwear — light hikers are the way to go, given the steep approach on a Class 1 trail and the need for dexterity during the scramble (I wore Tecnica’s Plasma low hiker). Look for a shoe with solid, sticky soles and if you’re bringing crampons, make sure they fit before you head out. If snow and ice are present on the mountain in places besides the snow bridge, go for a full-sized boot.
- Poles — Bring them if you have them. They will be useful from the trailhead to the start of the ridge, though you will likely put them away from the ridge to the summit. Poles are very helpful on the descent if you’d like to have functional knees the next day.
- Helmet — I’d never talk someone out of wearing a helmet, though we didn’t bring ours. Helmets are most useful if there are other hikers on the final summit push on loose, steep, class 2 terrain. Had we climbed spring through mid-summer, I would have brought a helmet for the slippery ice/snow factor.
- Water — 3 liters (100 oz.) is a safe supply. Beer on the summit is optional. There are no water sources on the route.
- Headlamp — You’ll likely be starting this hike in dark, so bring a reliable headlamp with fully charged batteries.
- Standard Layers — Treeline disappears around 8,900’ and it will be cooler on the ridge. Bring insulating layers, a winter hat, gloves, and a rain shell. Lightweight gloves can help with your hands on the scrambling as the rock is sharp in places. A cheap pair of Home Depot work gloves will do the trick. The hike down can get hot, so a short-sleeved base layer and zip-off pants that convert into shorts are fine ideas.
- Sunglasses and Sunblock — yes, bring them and use them.
- Locator Device / First-Aid — Borah Peak is remote and there’s no guarantee there will be other hikers on the mountain if things go pear-shaped. A solid First-Aid kit is always a good idea (and I find Advil Liqui-Gels are good for low-grade headaches from altitude or lack of sleep). I bring along a Garmin inReach for backcountry adventures as an emergency locator.
- OPTIONAL – Rope, harness, belay device, anchoring gear — The second crux tower could be considered low 5th class climbing. When you first reach it, you’ll be required to downclimb face in about 20 feet. Experienced climbers can get this move without ropes. Handholds are excellent and once down, they can spot less-confident climbers. Ropes and gear (and the knowledge on how to use them) are good ideas for those who want to add a margin of safety at this spot. Note that in late summer, it’s possible to skirt around this move on the ascent with a tricky Class 3 escape from the “White Gully” (see Route Description) and a four-on-the-floor scramble up the Frozen Dirt Gully. If the Frozen Dirt Gully is filled with snow, stick to the tower downclimb.
-
Driving Directions to Borah Peak Trailhead
Directions from Boise
The 4-hour drive from Boise is 238 miles (Google Maps link here). Take Interstate 84 S to Highway 20 E near the town of Mountain Home. Stay on Highway 20 E to the town of Carey, where it merges with US-26 E. Stay on this road to the town of Arco and turn north (left) onto US-93 N. Continue on US-93 N through the town of Mackay to the right turn onto Birch Springs Road (CR 279). In late 2018, this road was not well-signed but easy to spot, thanks to cattle grate and some signage a few dozen into the road itself. If for some reason you’re not using a navigation app, the turn is 23.2 miles from the town of Mackay, about a 30-minute drive.Follow Birch Spring Road 2.9 miles to the trailhead parking and campsites.
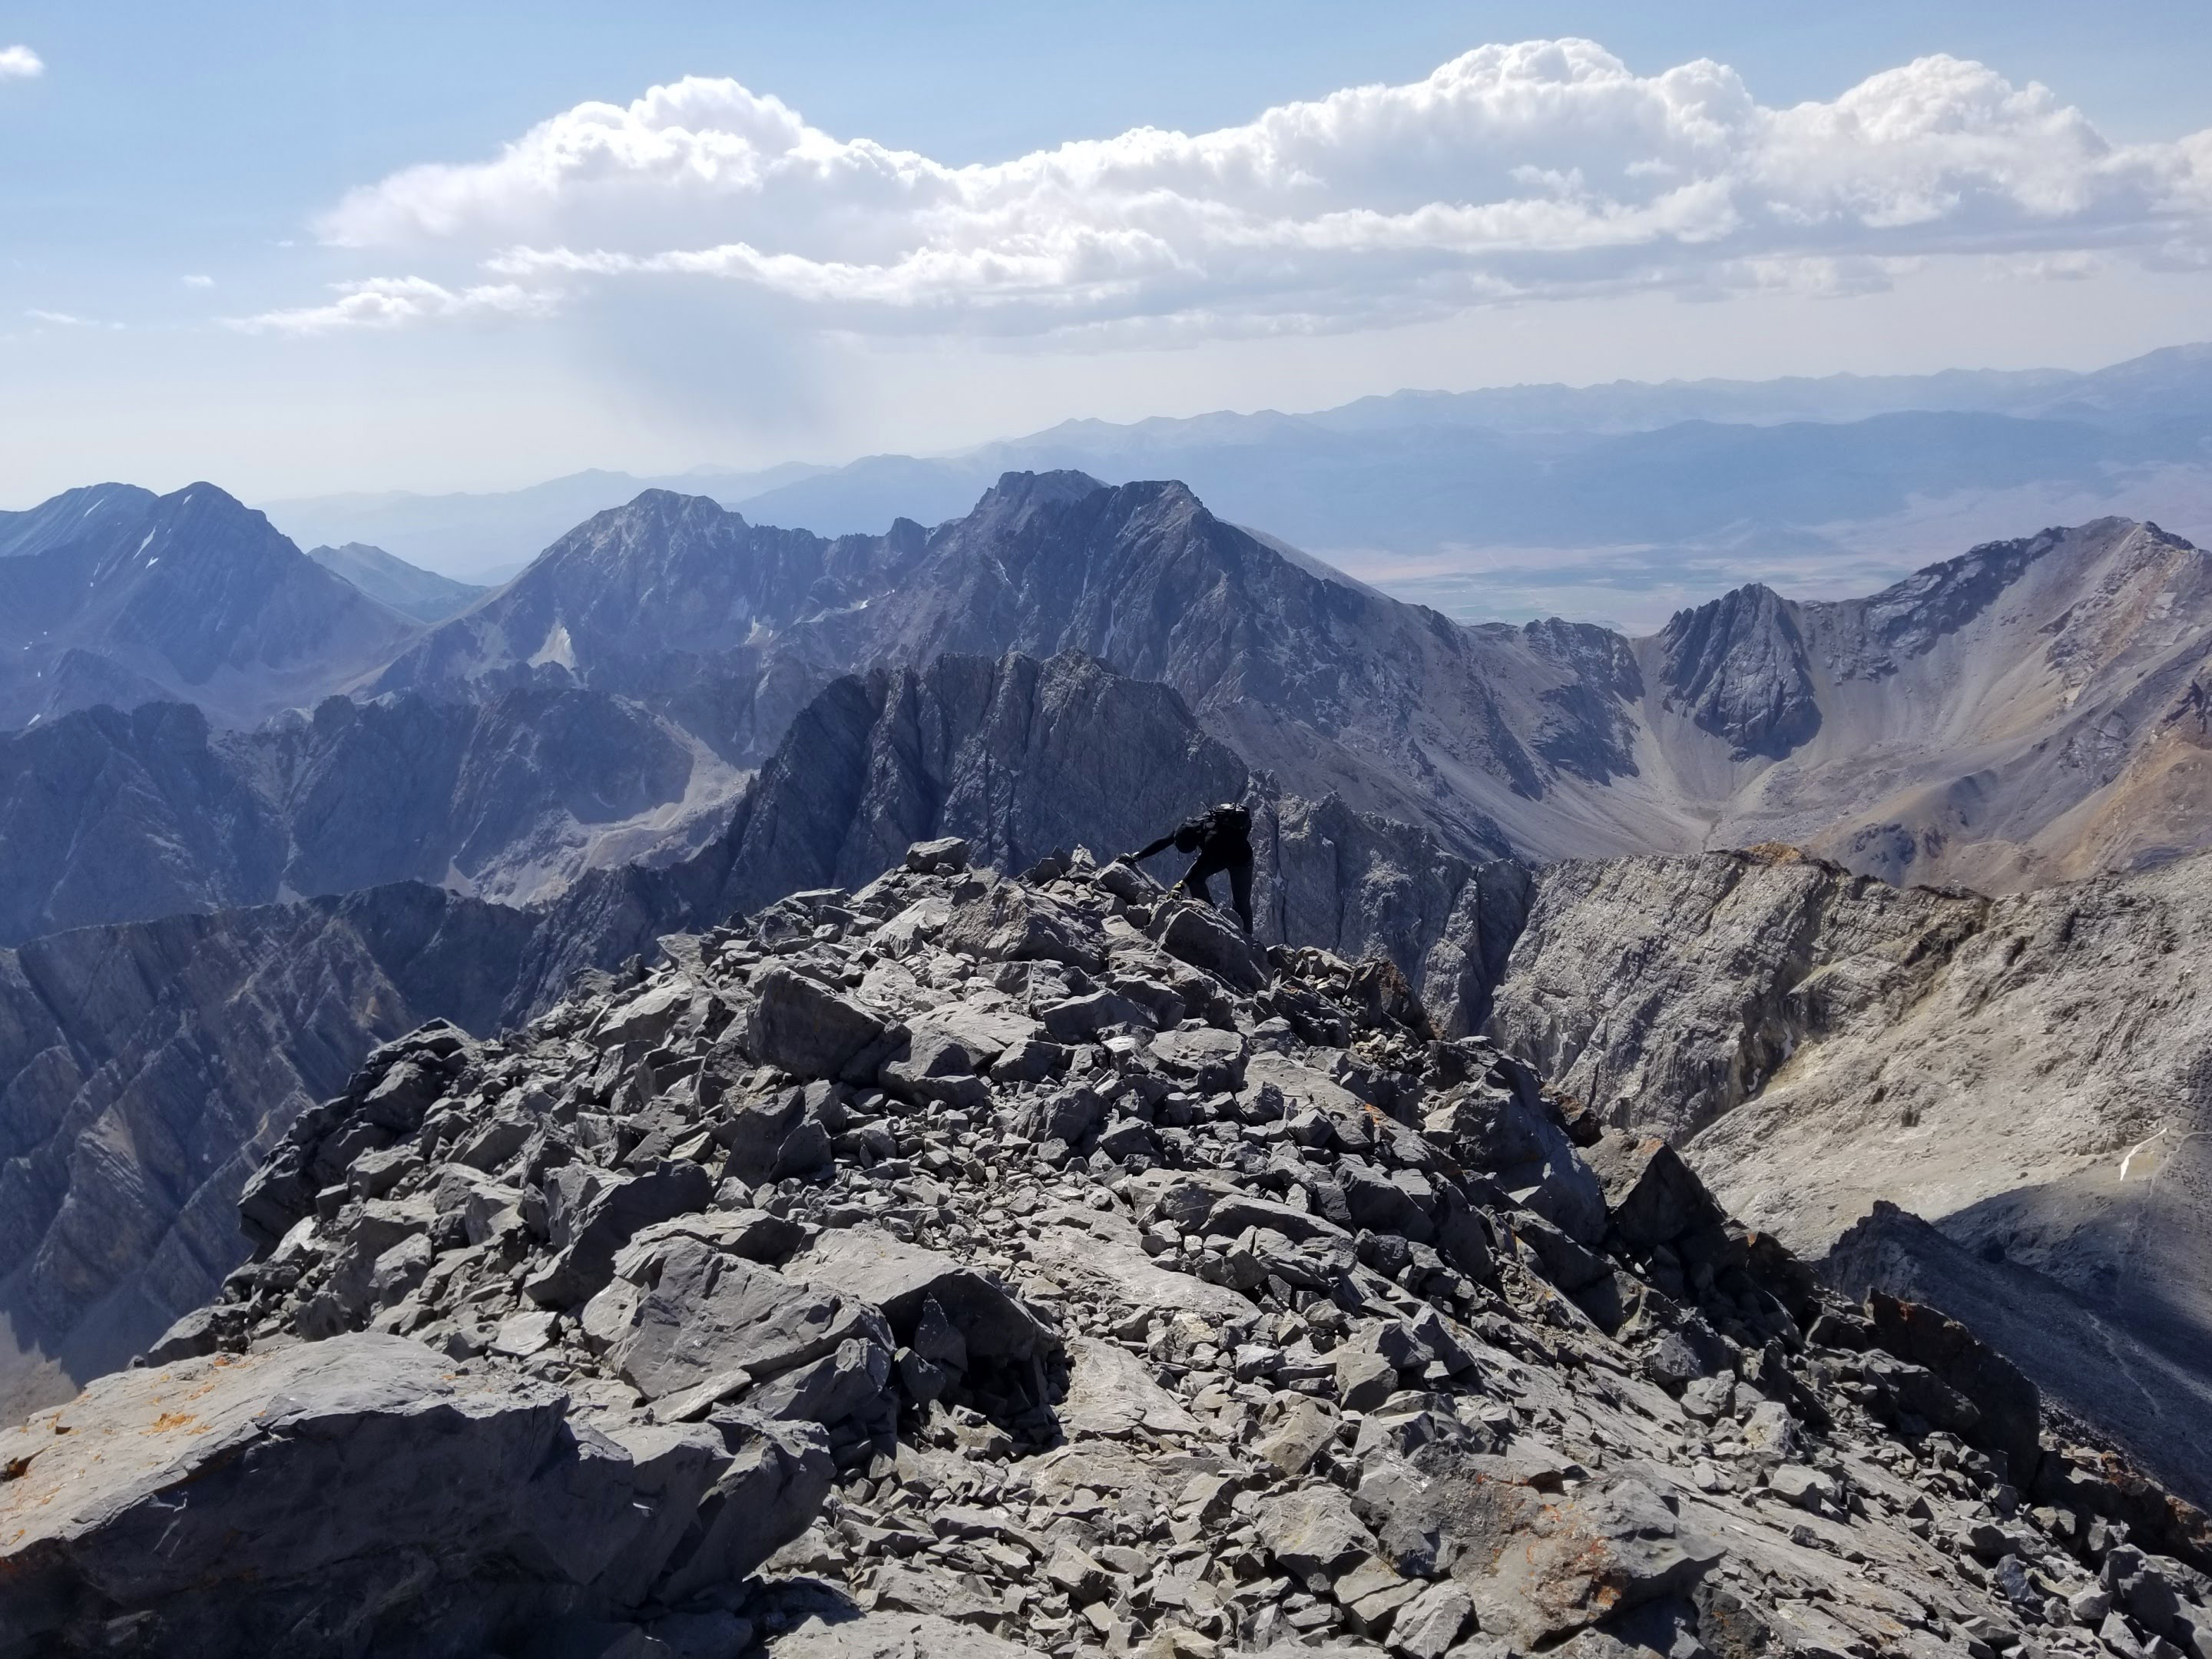
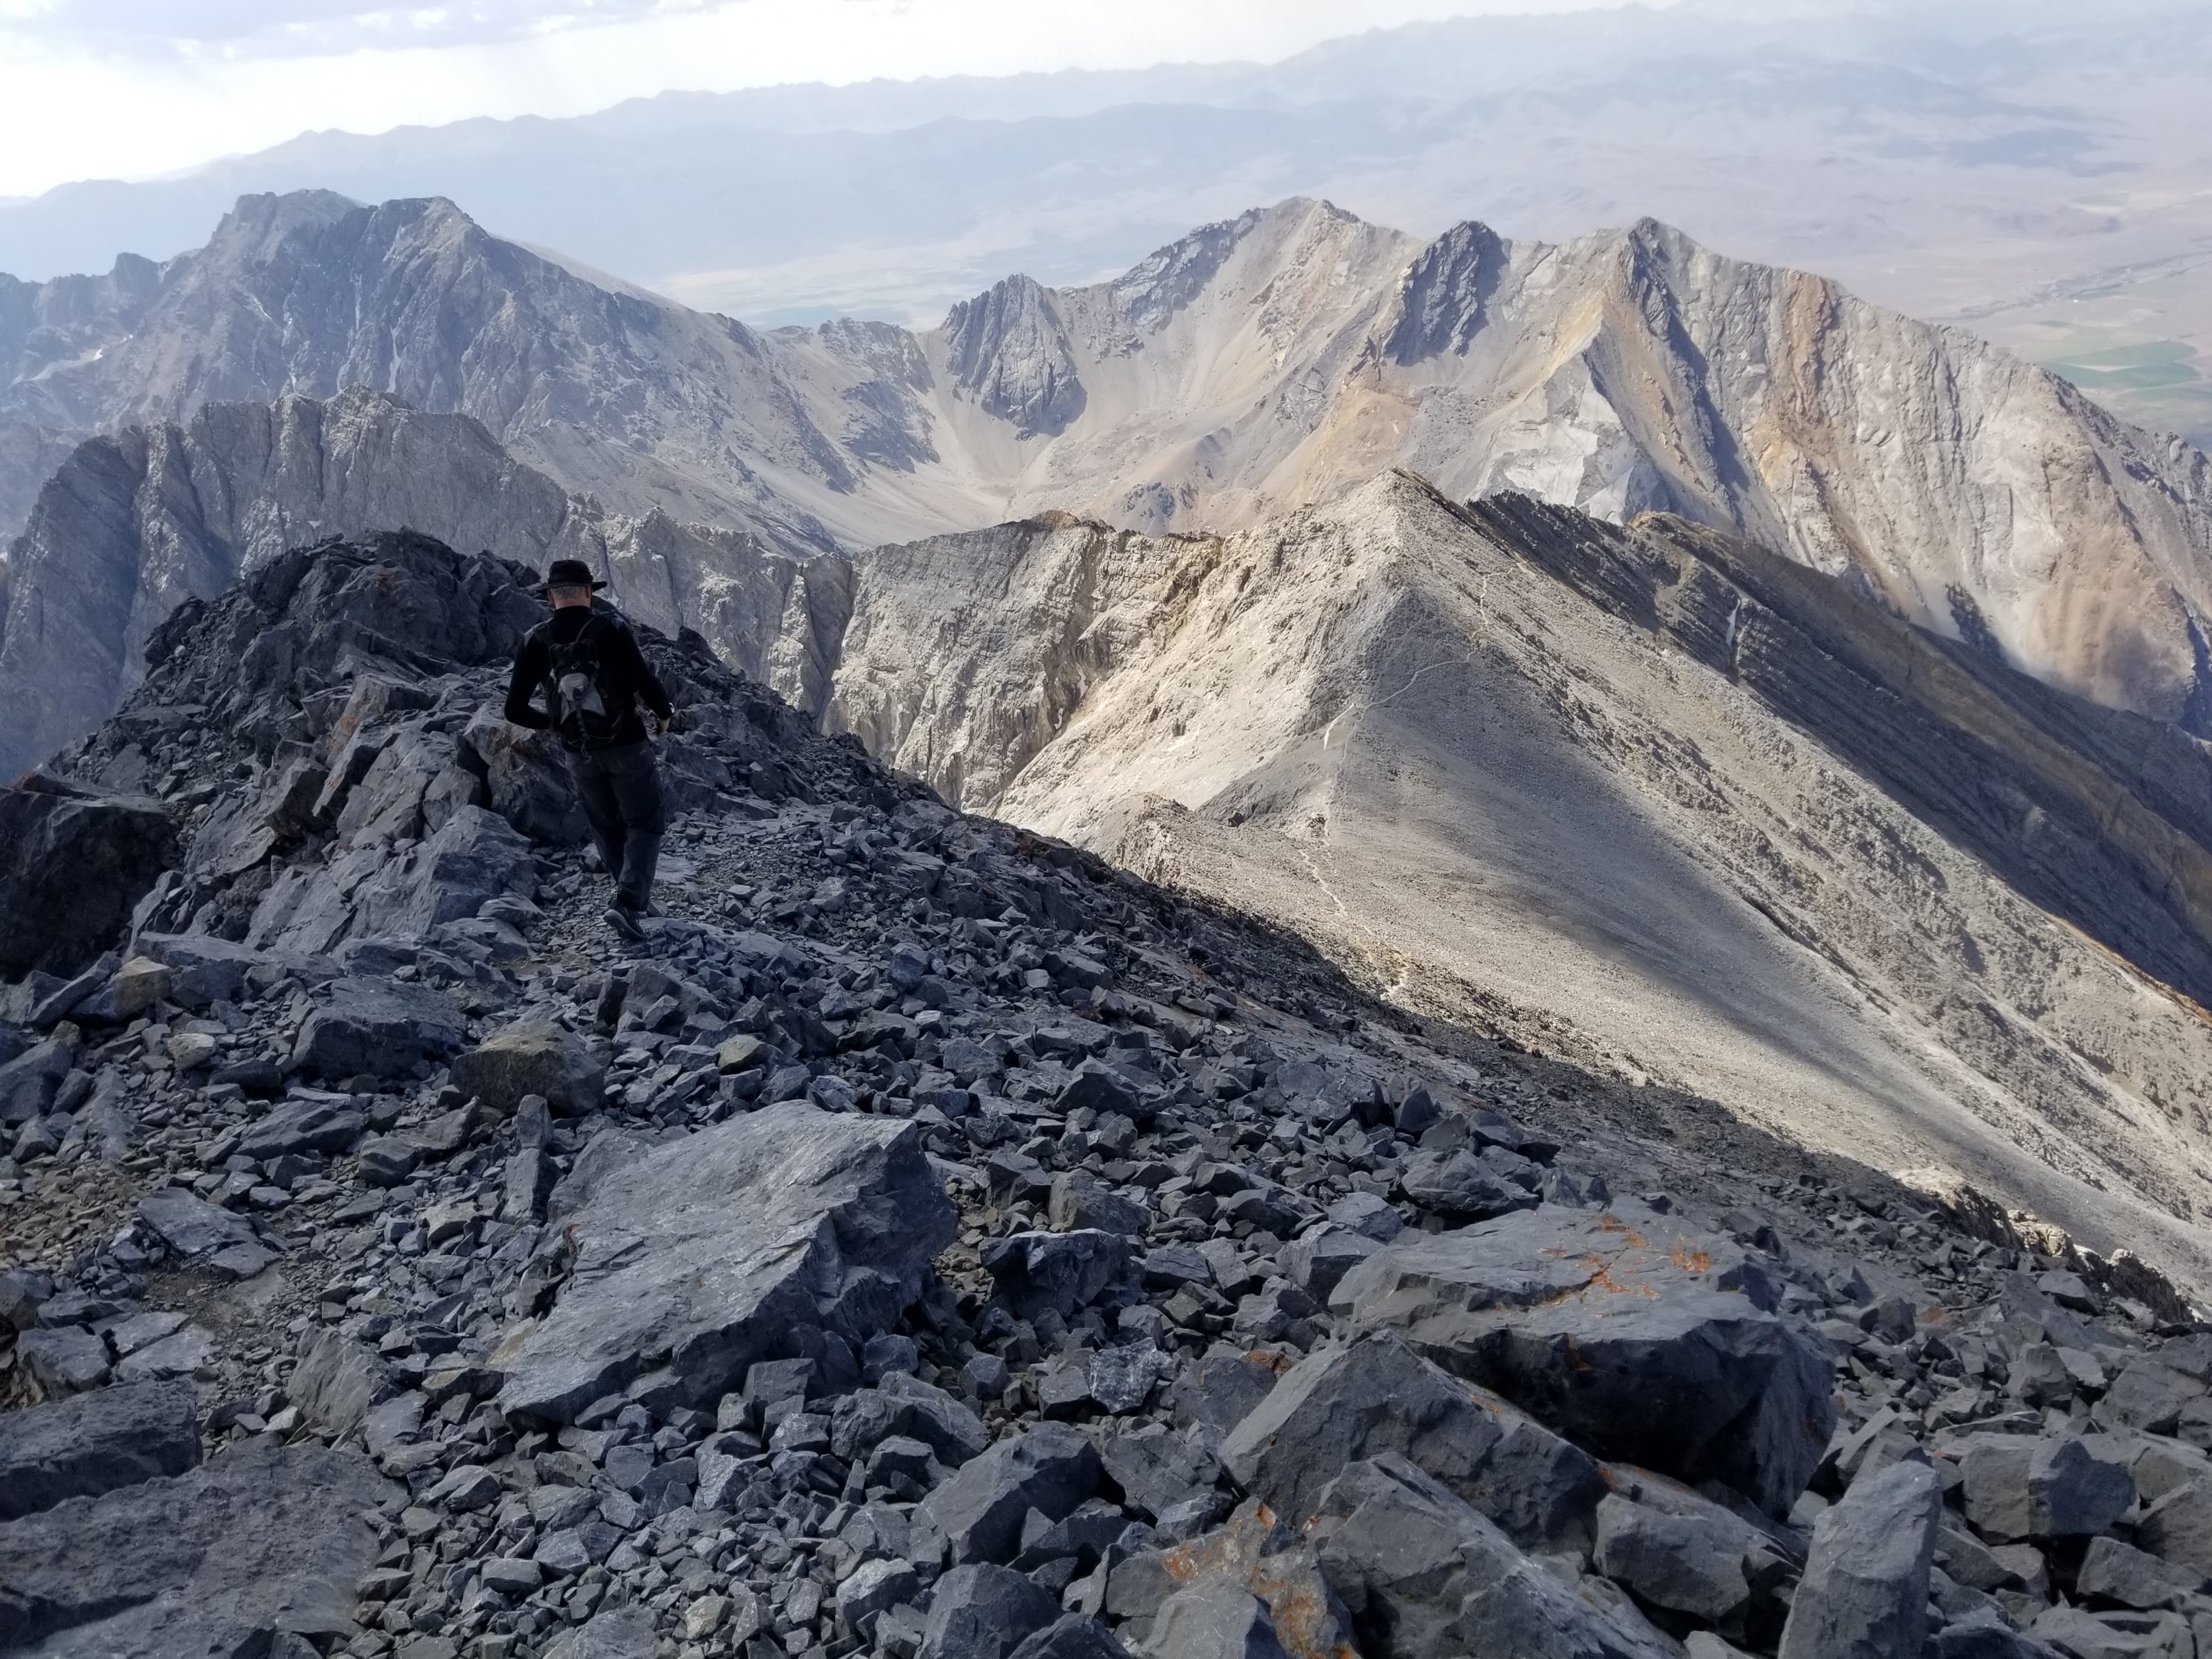
Borah Peak – Chicken Out Ridge Route Description
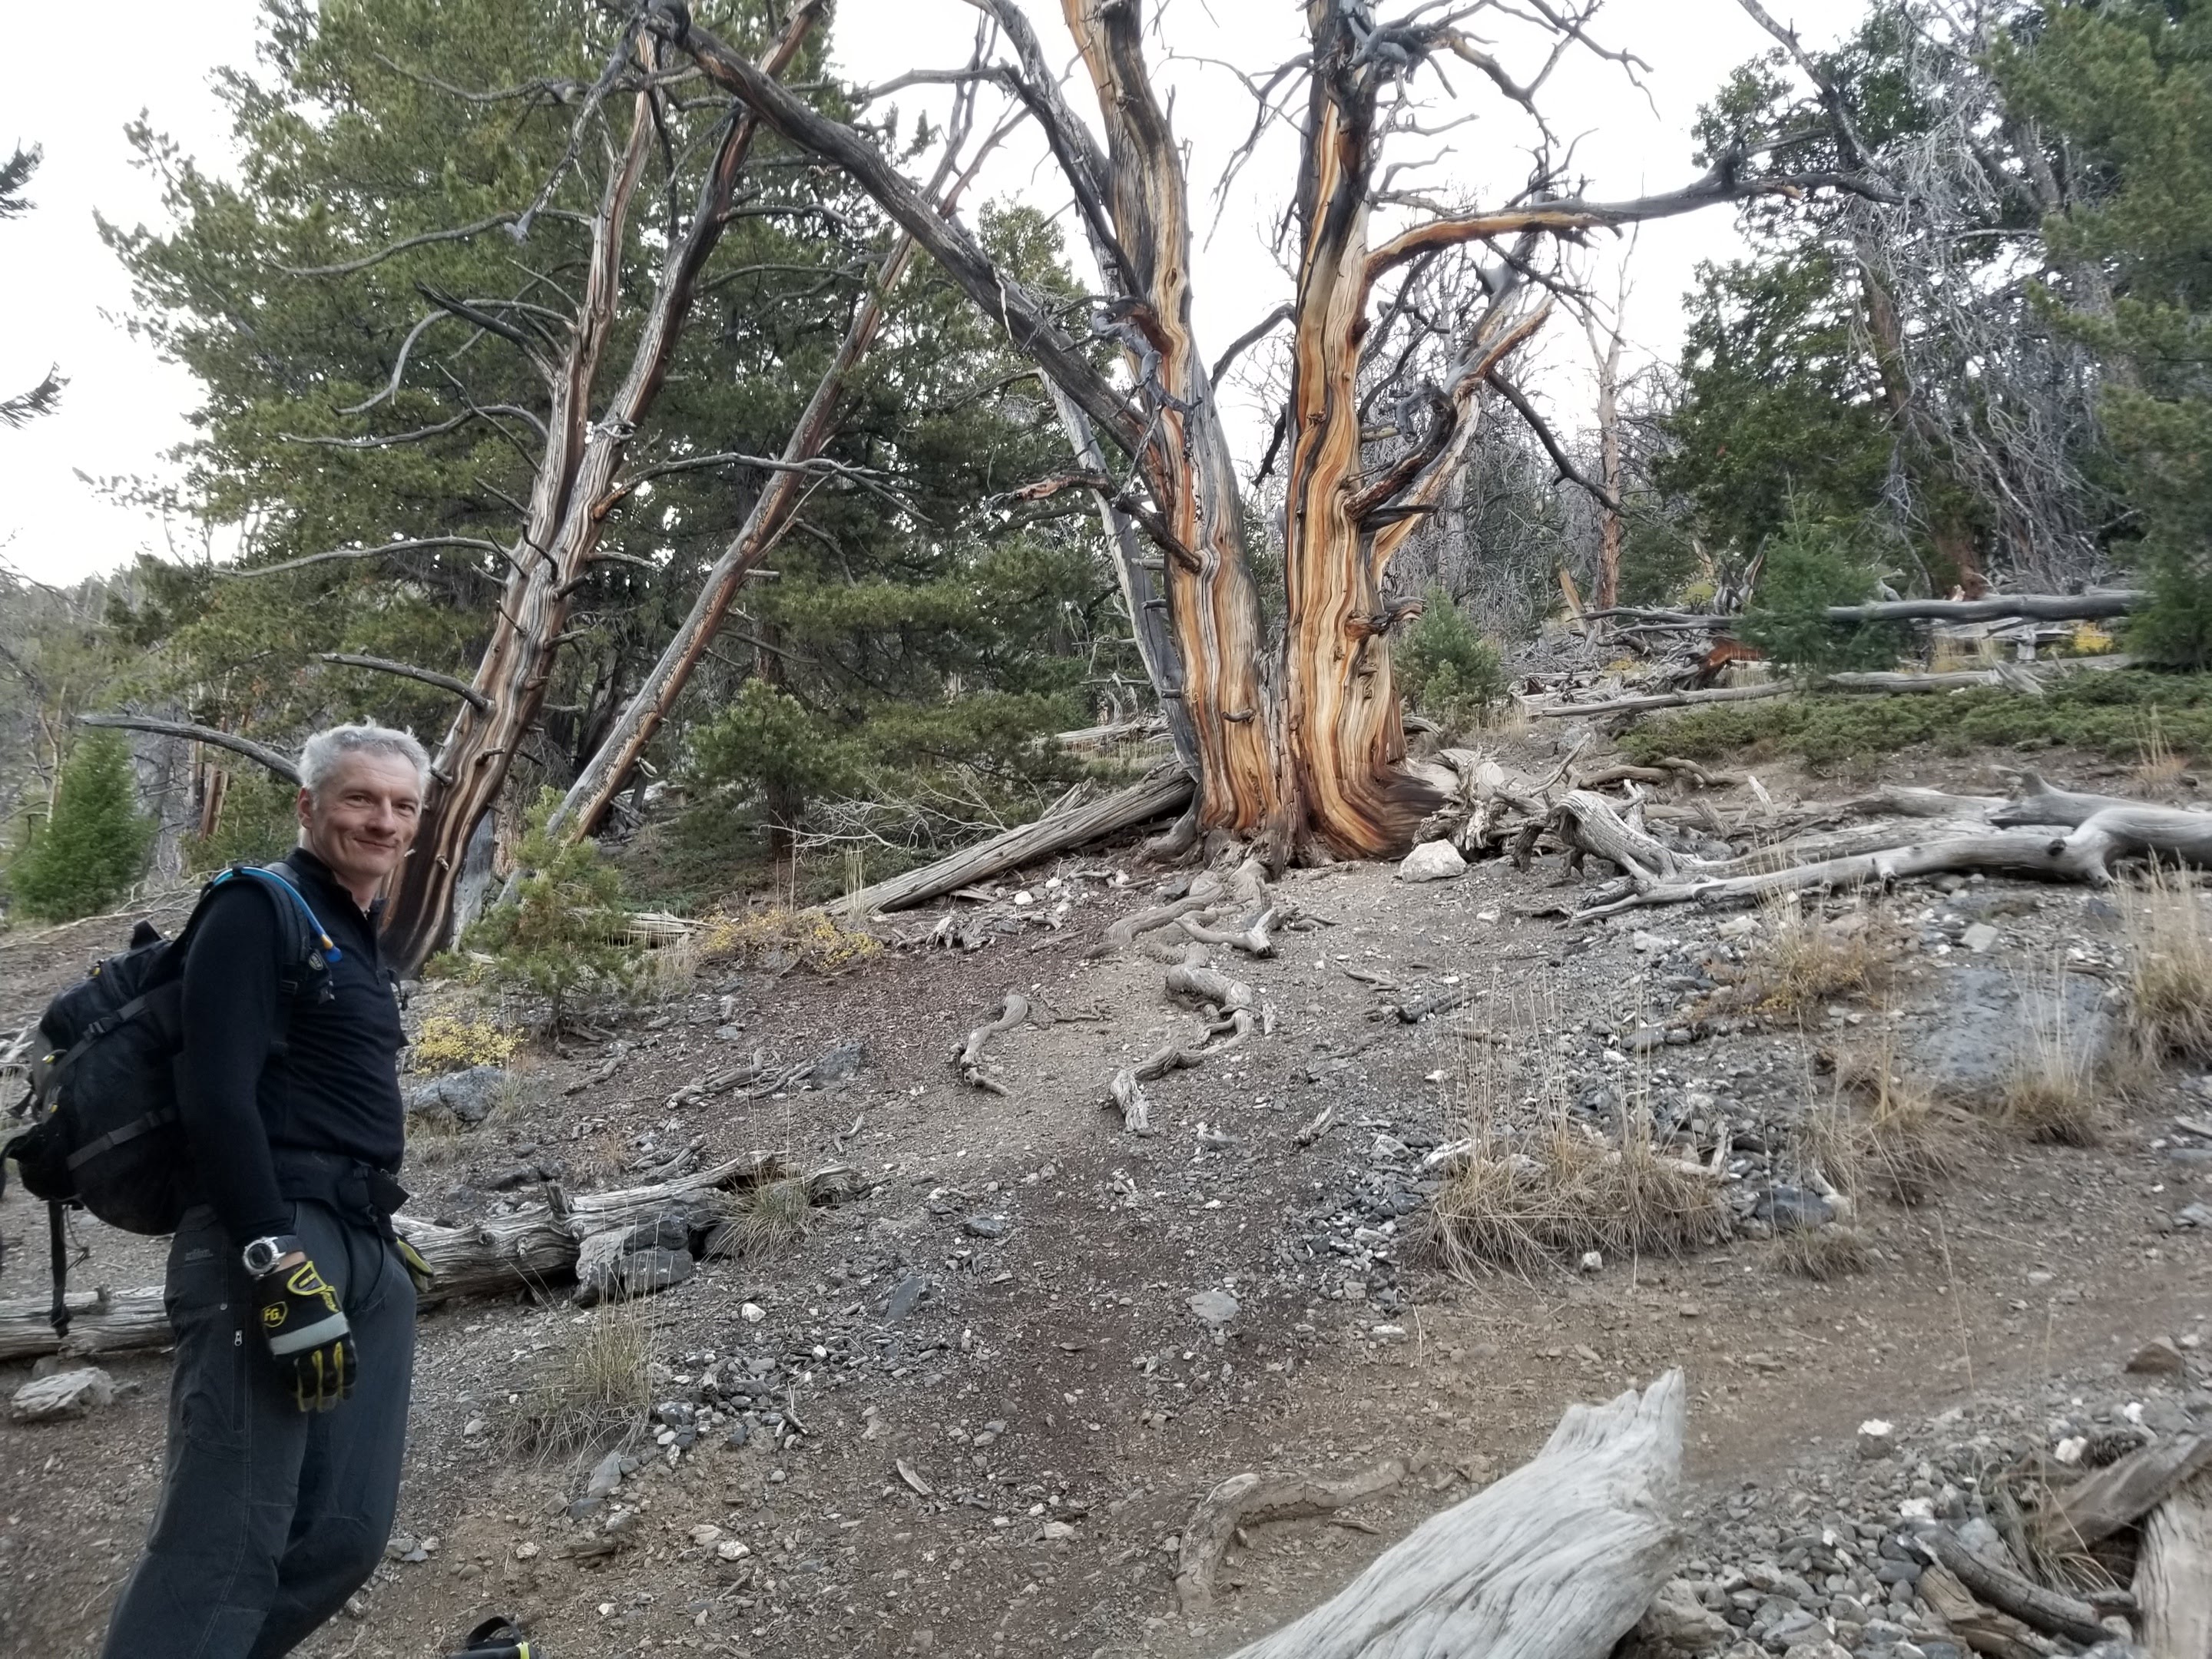
A gnarled, twisted forest welcomes you on the steep approach to treeline.
0.0 miles – Rise n’ shine! 5:30 AM is a normal start that provides enough time to avoid afternoon thunderstorms. Given the amount of time you’ll be over treeline, starting even earlier is not a bad idea. If you’ve arrived after dark, note that the trail starts at the far east side of the parking lot, not at the Mount Borah sign and restrooms. The trail is well-defined, easy to follow, and relentless as it ascends.
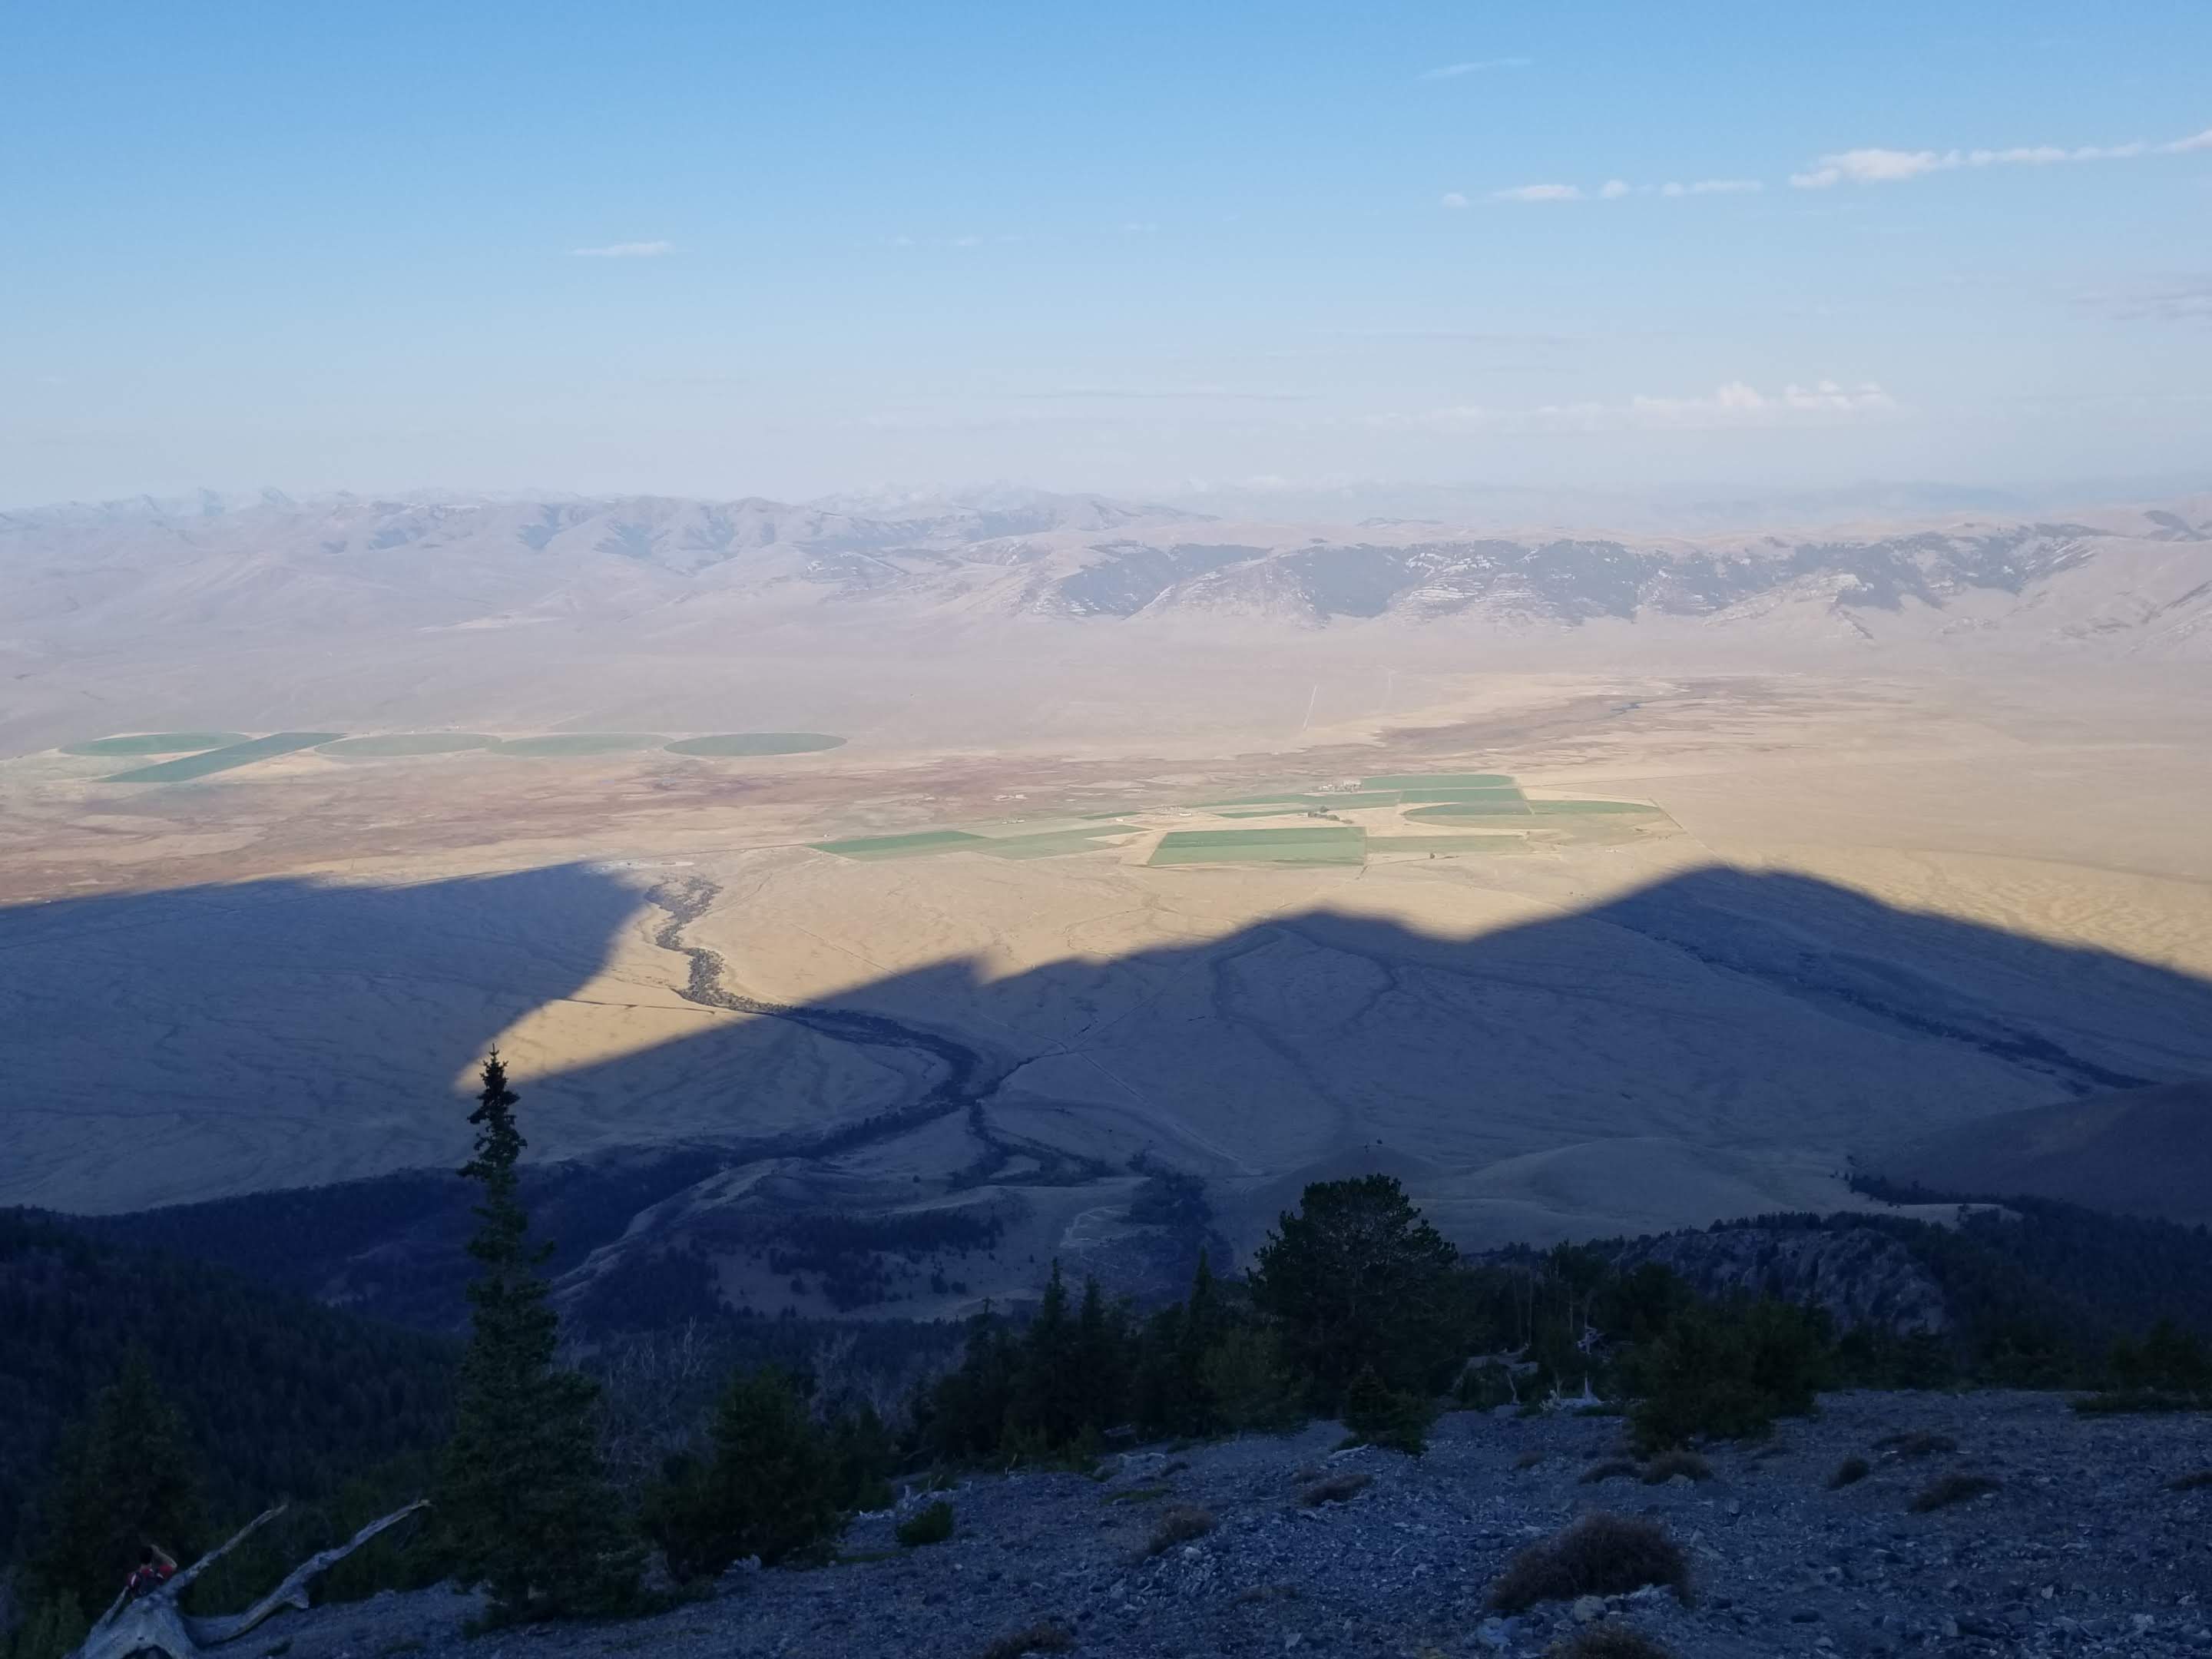
Mount Borah casts a mountainous shadow over the eastern valley.
- 1.4 miles – Enjoy the closest thing to a flat section as the trail climbs out of a gully and begins trending directly toward the ridge. This flat section lasts all of 30 feet, giving you about 20 seconds to celebrate. Grind up through a ghostly forest of gnarled trees. In the distance to your right is the impressive profile of Peak 11,367’. Borah’s hulking summit slowly emerges dead-ahead, rising above the foothills like an enormous tombstone.
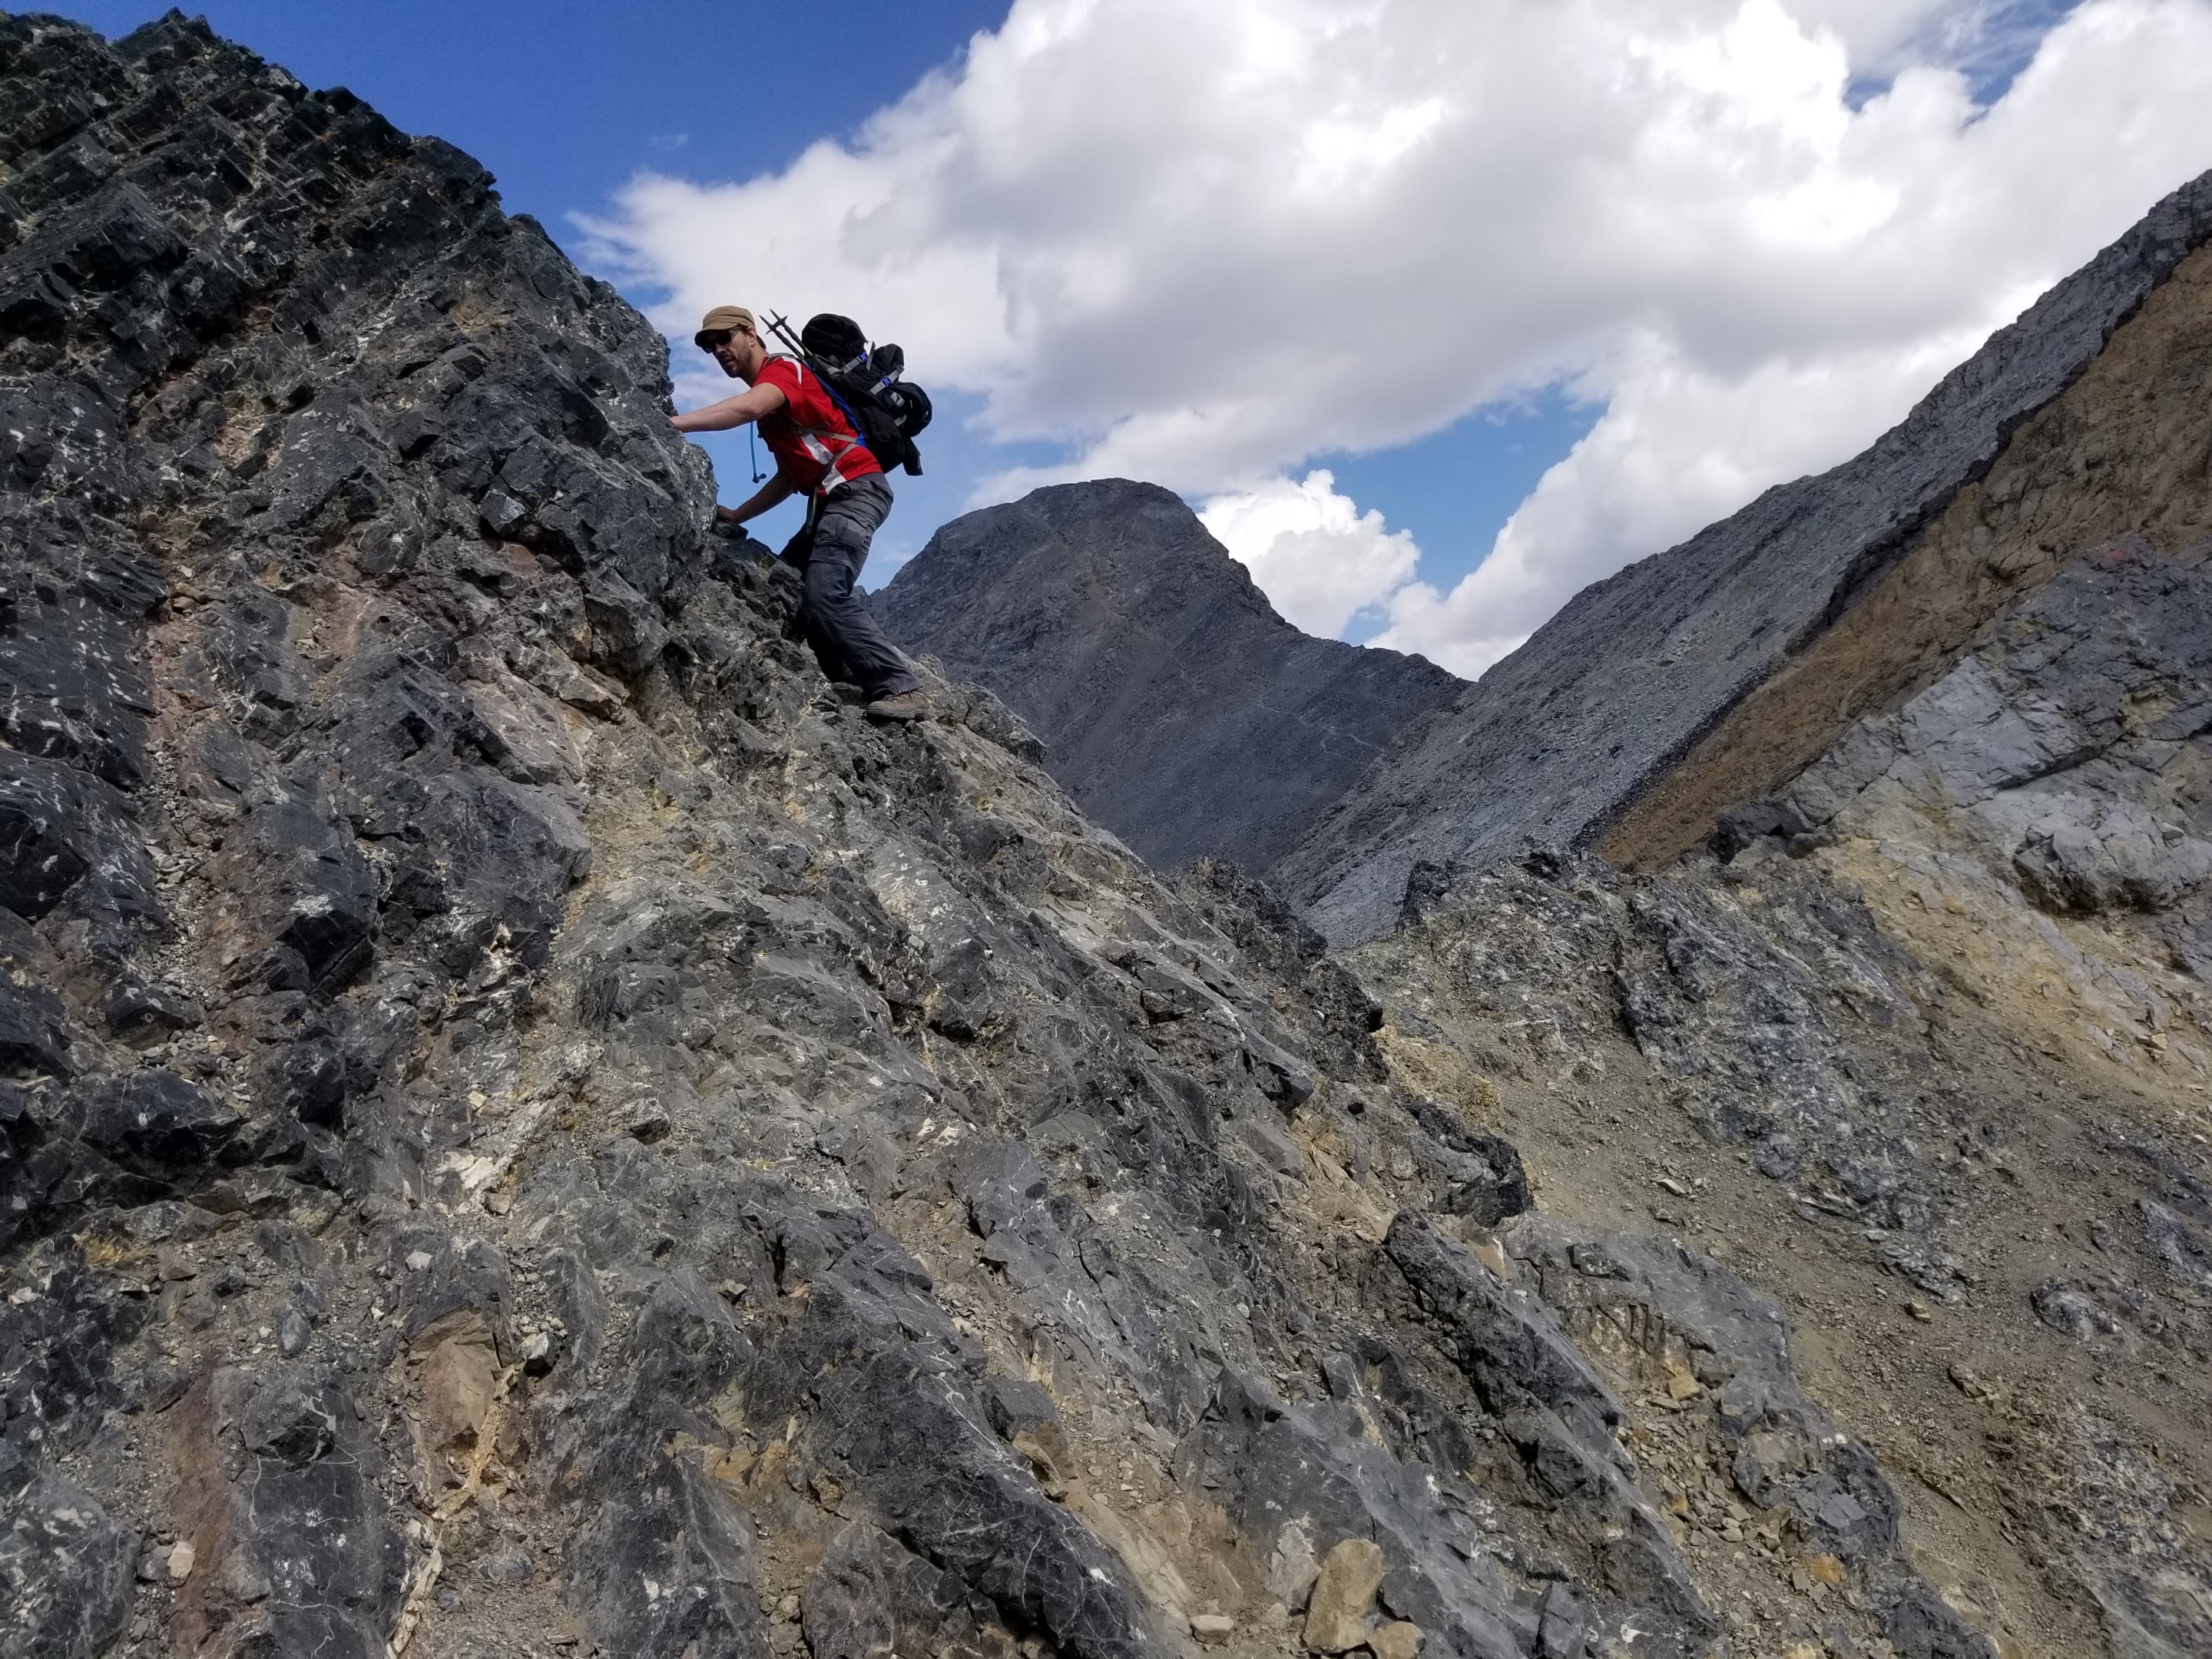
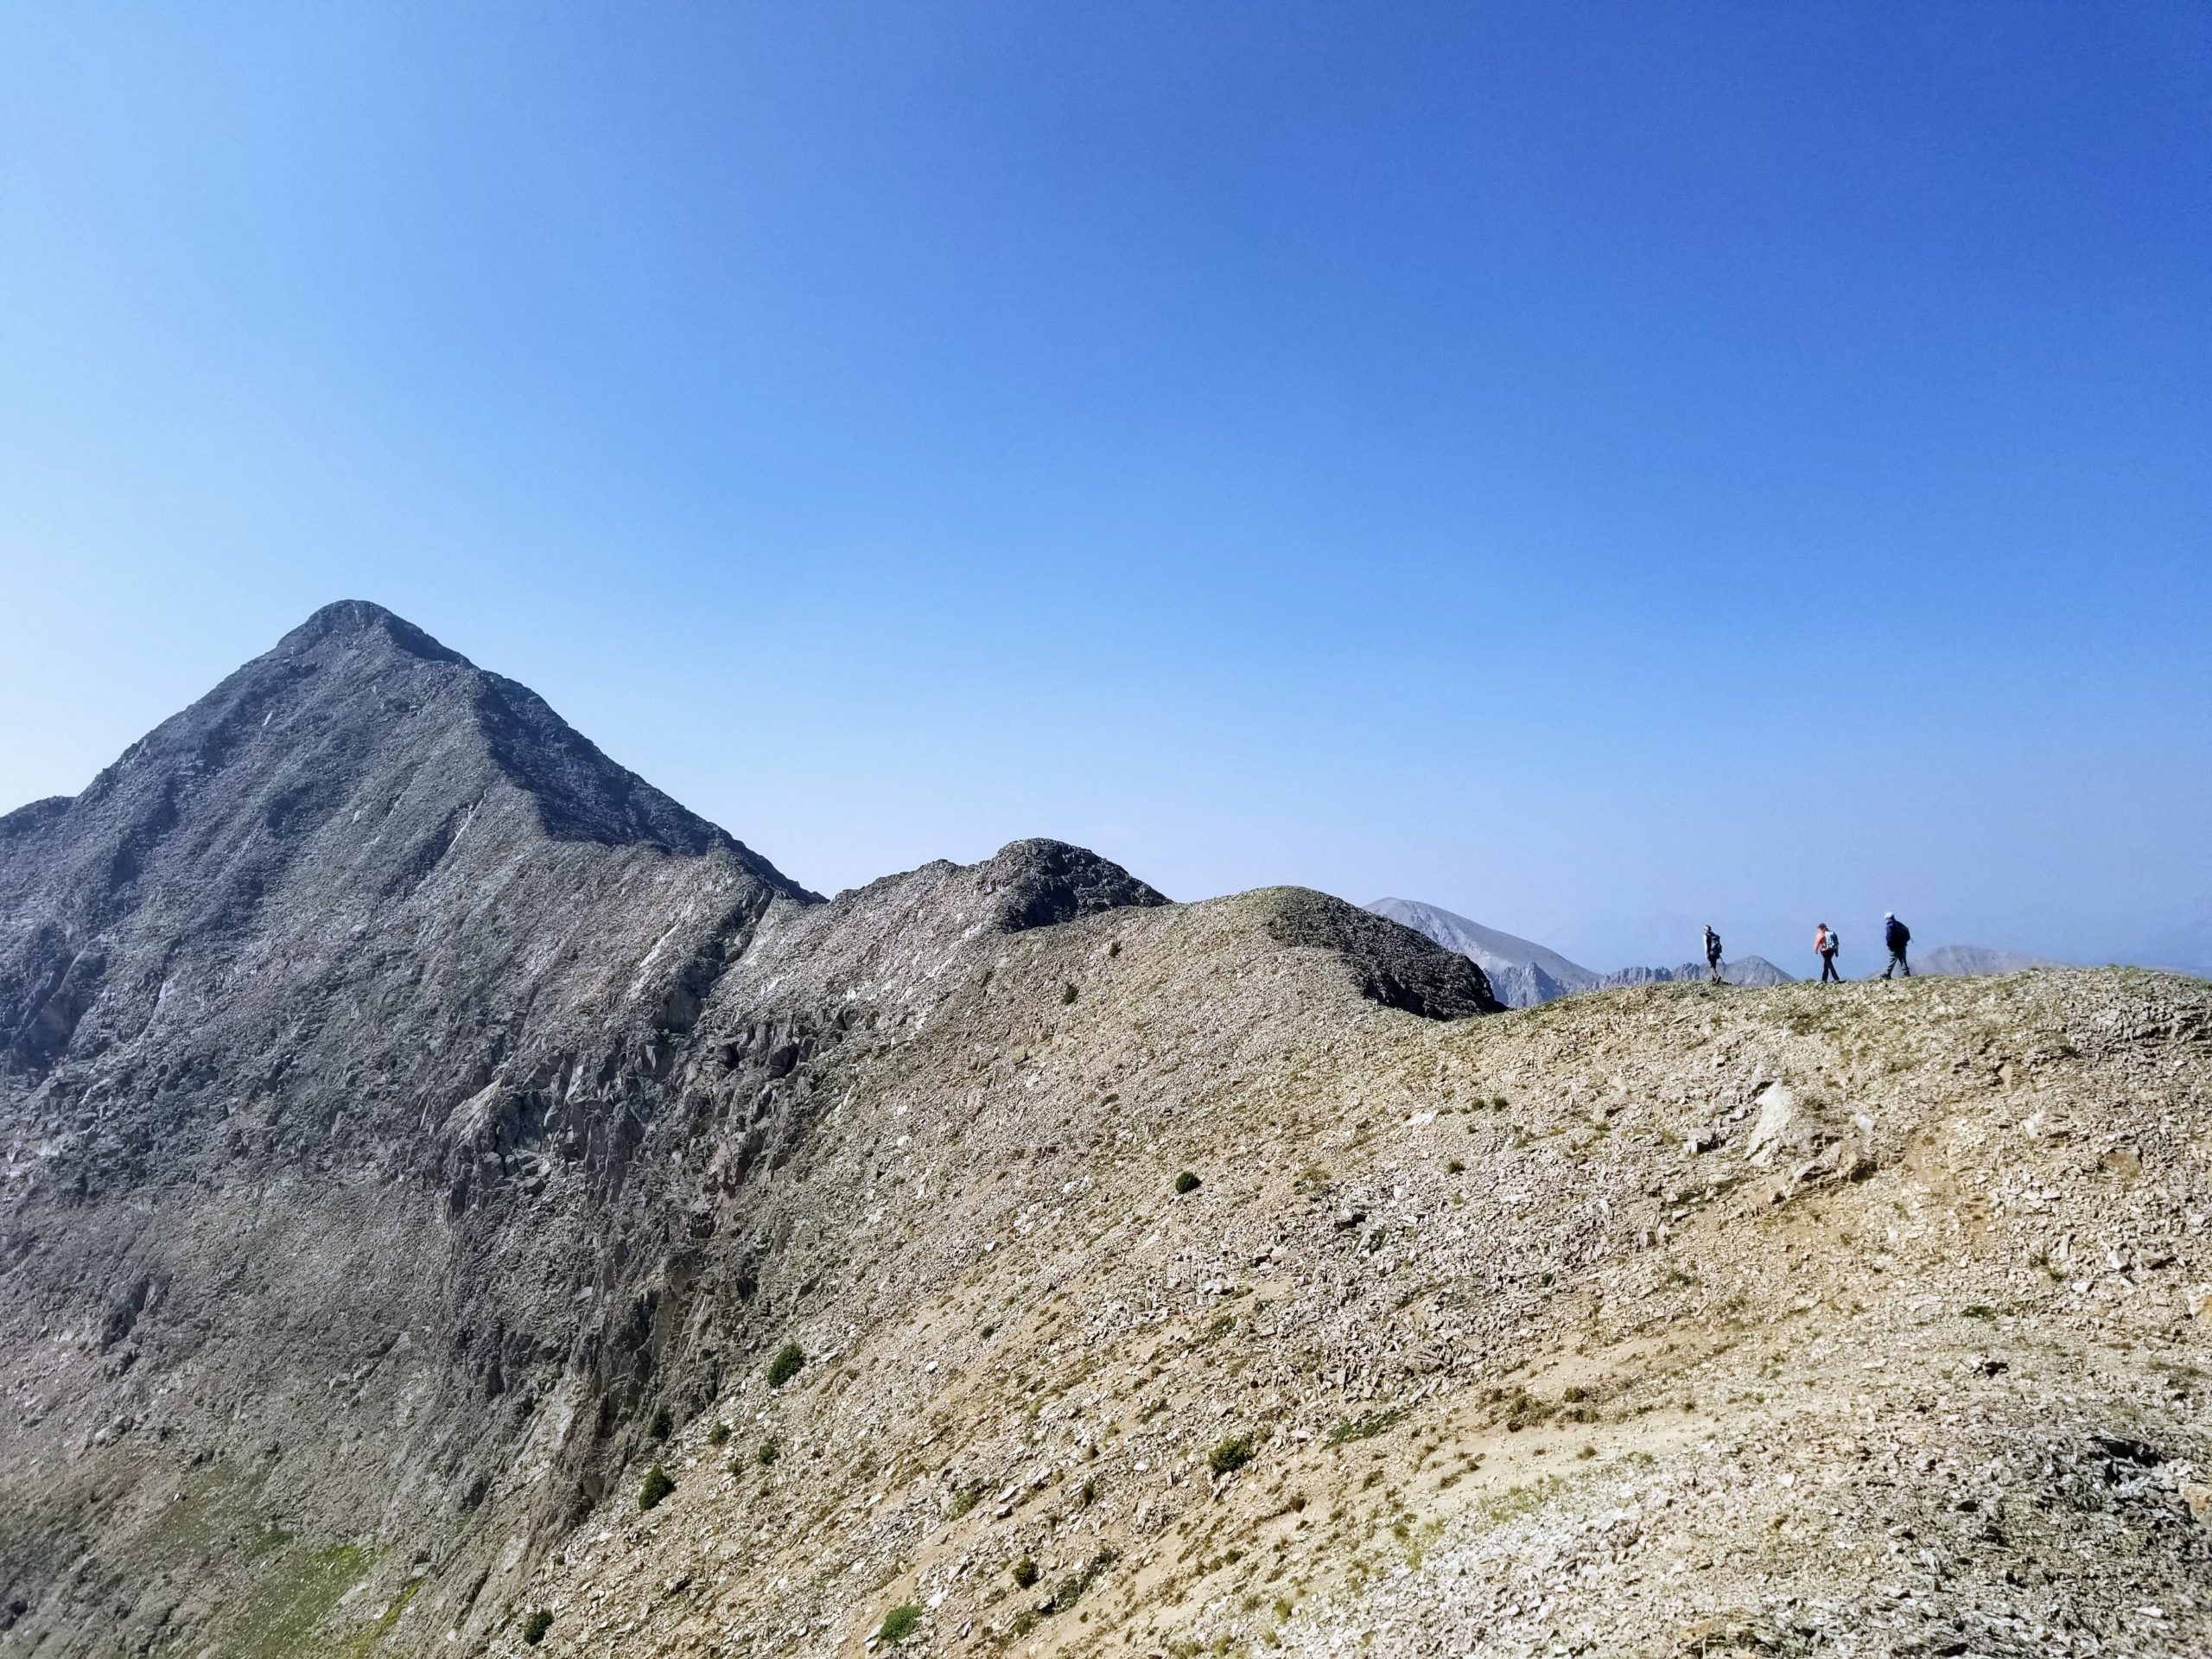
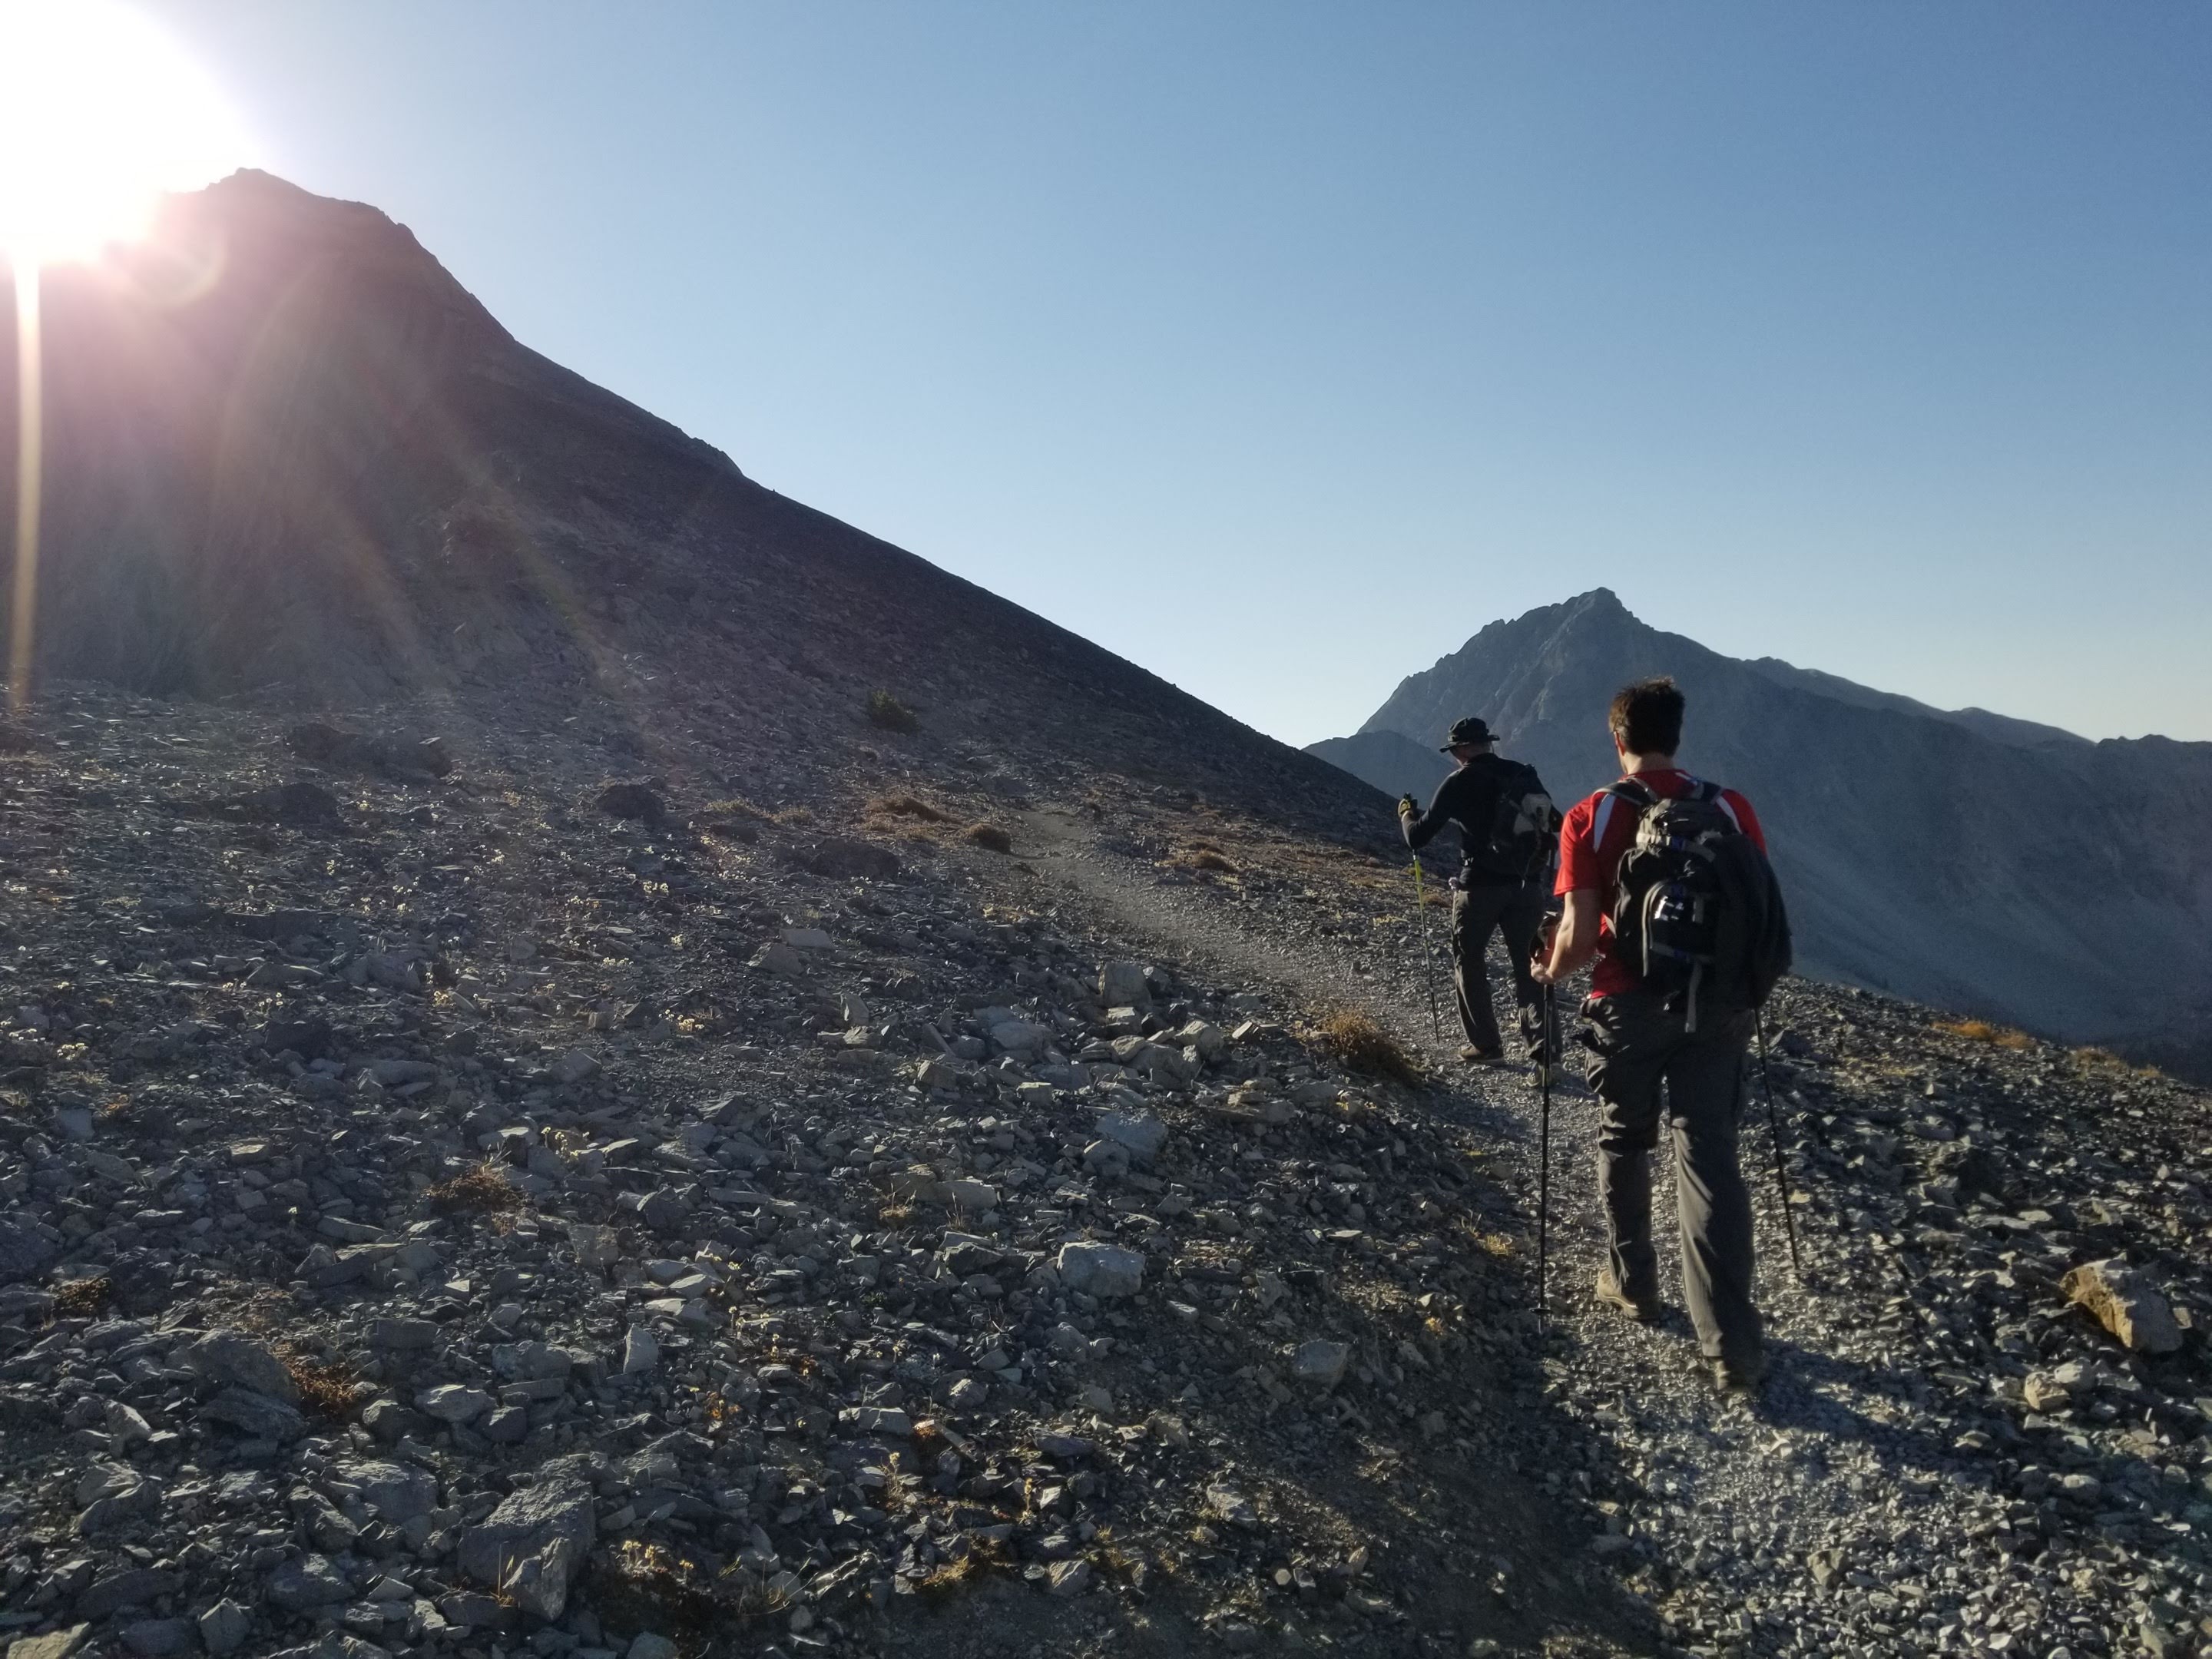
- 2.1 miles – 10,230’ – Break treeline. Borah’s summit appears just left of center on the horizon and the trail remains easy to follow. Gradually, the trail reaches a series of white stone rock shelves where it dissolves as the route trends left towards Chicken-Out Ridge. Continue up on solid class 3 rock, up a short gully to a small notch in the ridge. Welcome to Crux 1, the first big challenge and one of the places where chickening-out may momentarily seem like a fine idea.
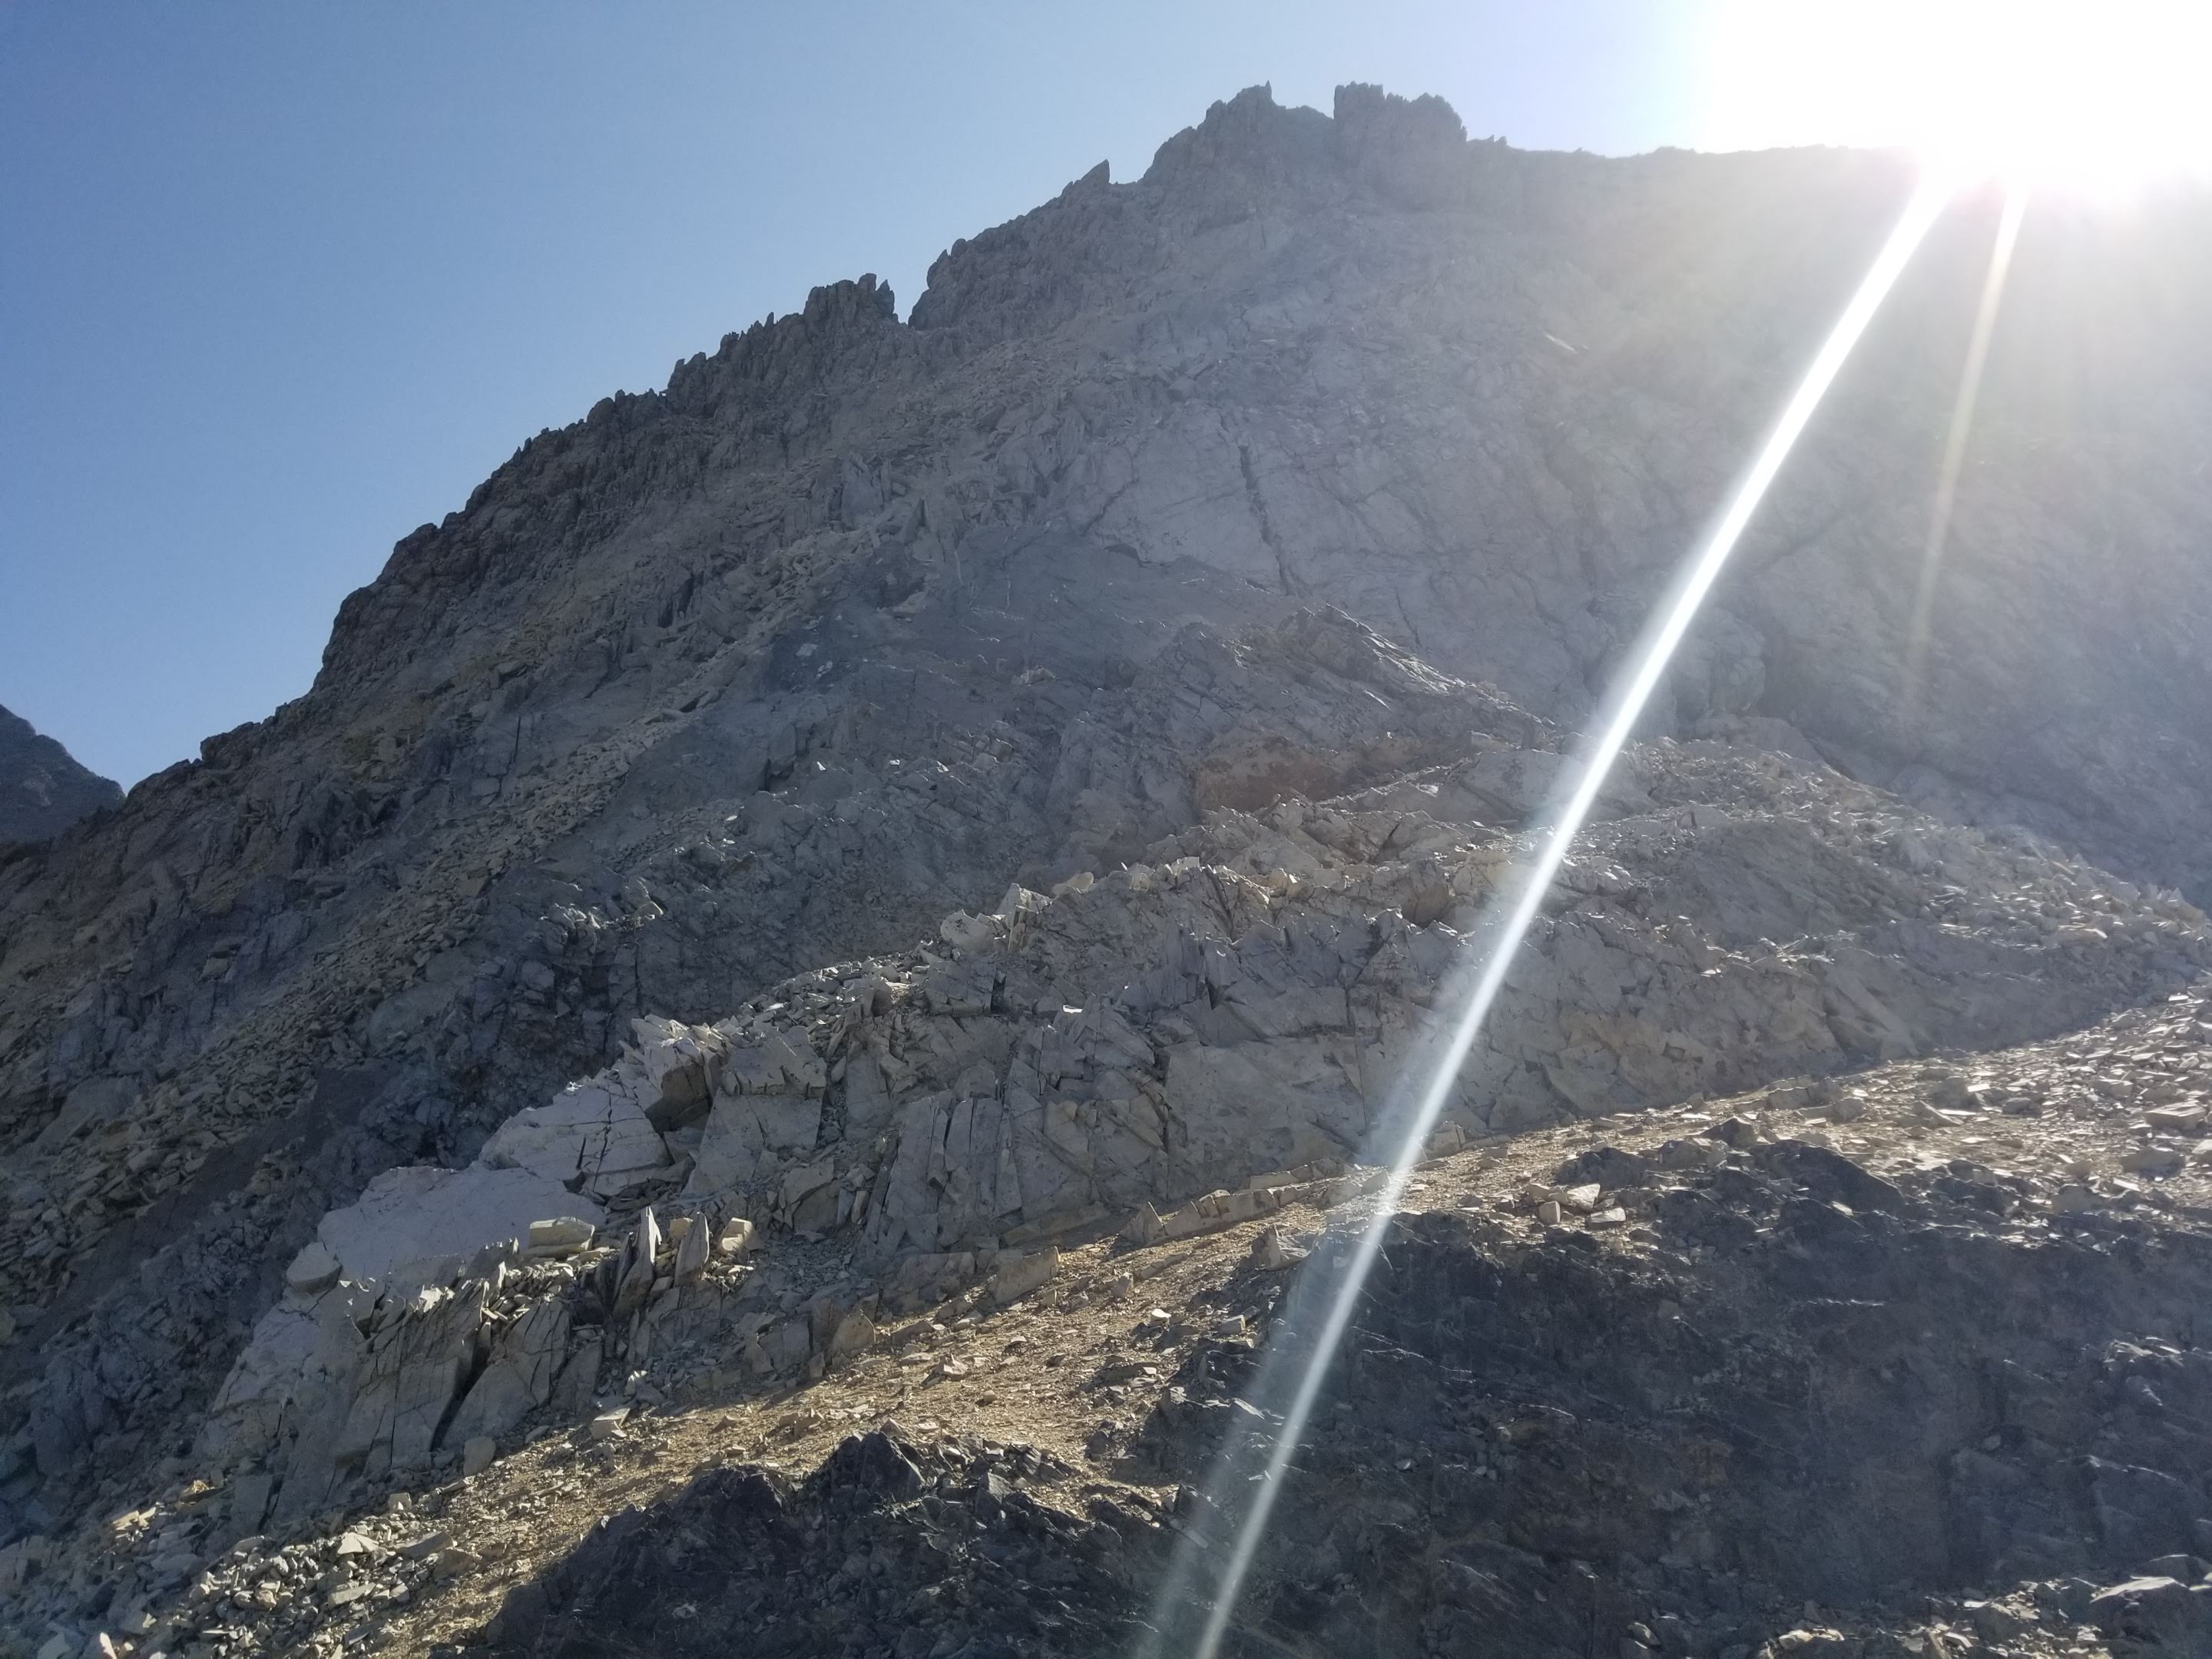
The trail fades out where Chicken Out Ridge begins. Get ready for Crux #1!
- 3.0 miles – At 11,380’ Crux 1 makes itself known after clearing a one-person-wide notch. There is one best option, one semi-good option, and one very bad option. From the small notch, it’s possible to stay on the ridge proper for about 100 feet (the semi-good option). This section is wickedly exposed, Class 4 with some very awkward moves to stay balanced—not for the faint of heart. If you’re an experienced, confident climber who shrugs off airy moves, this will be the quickest way across.
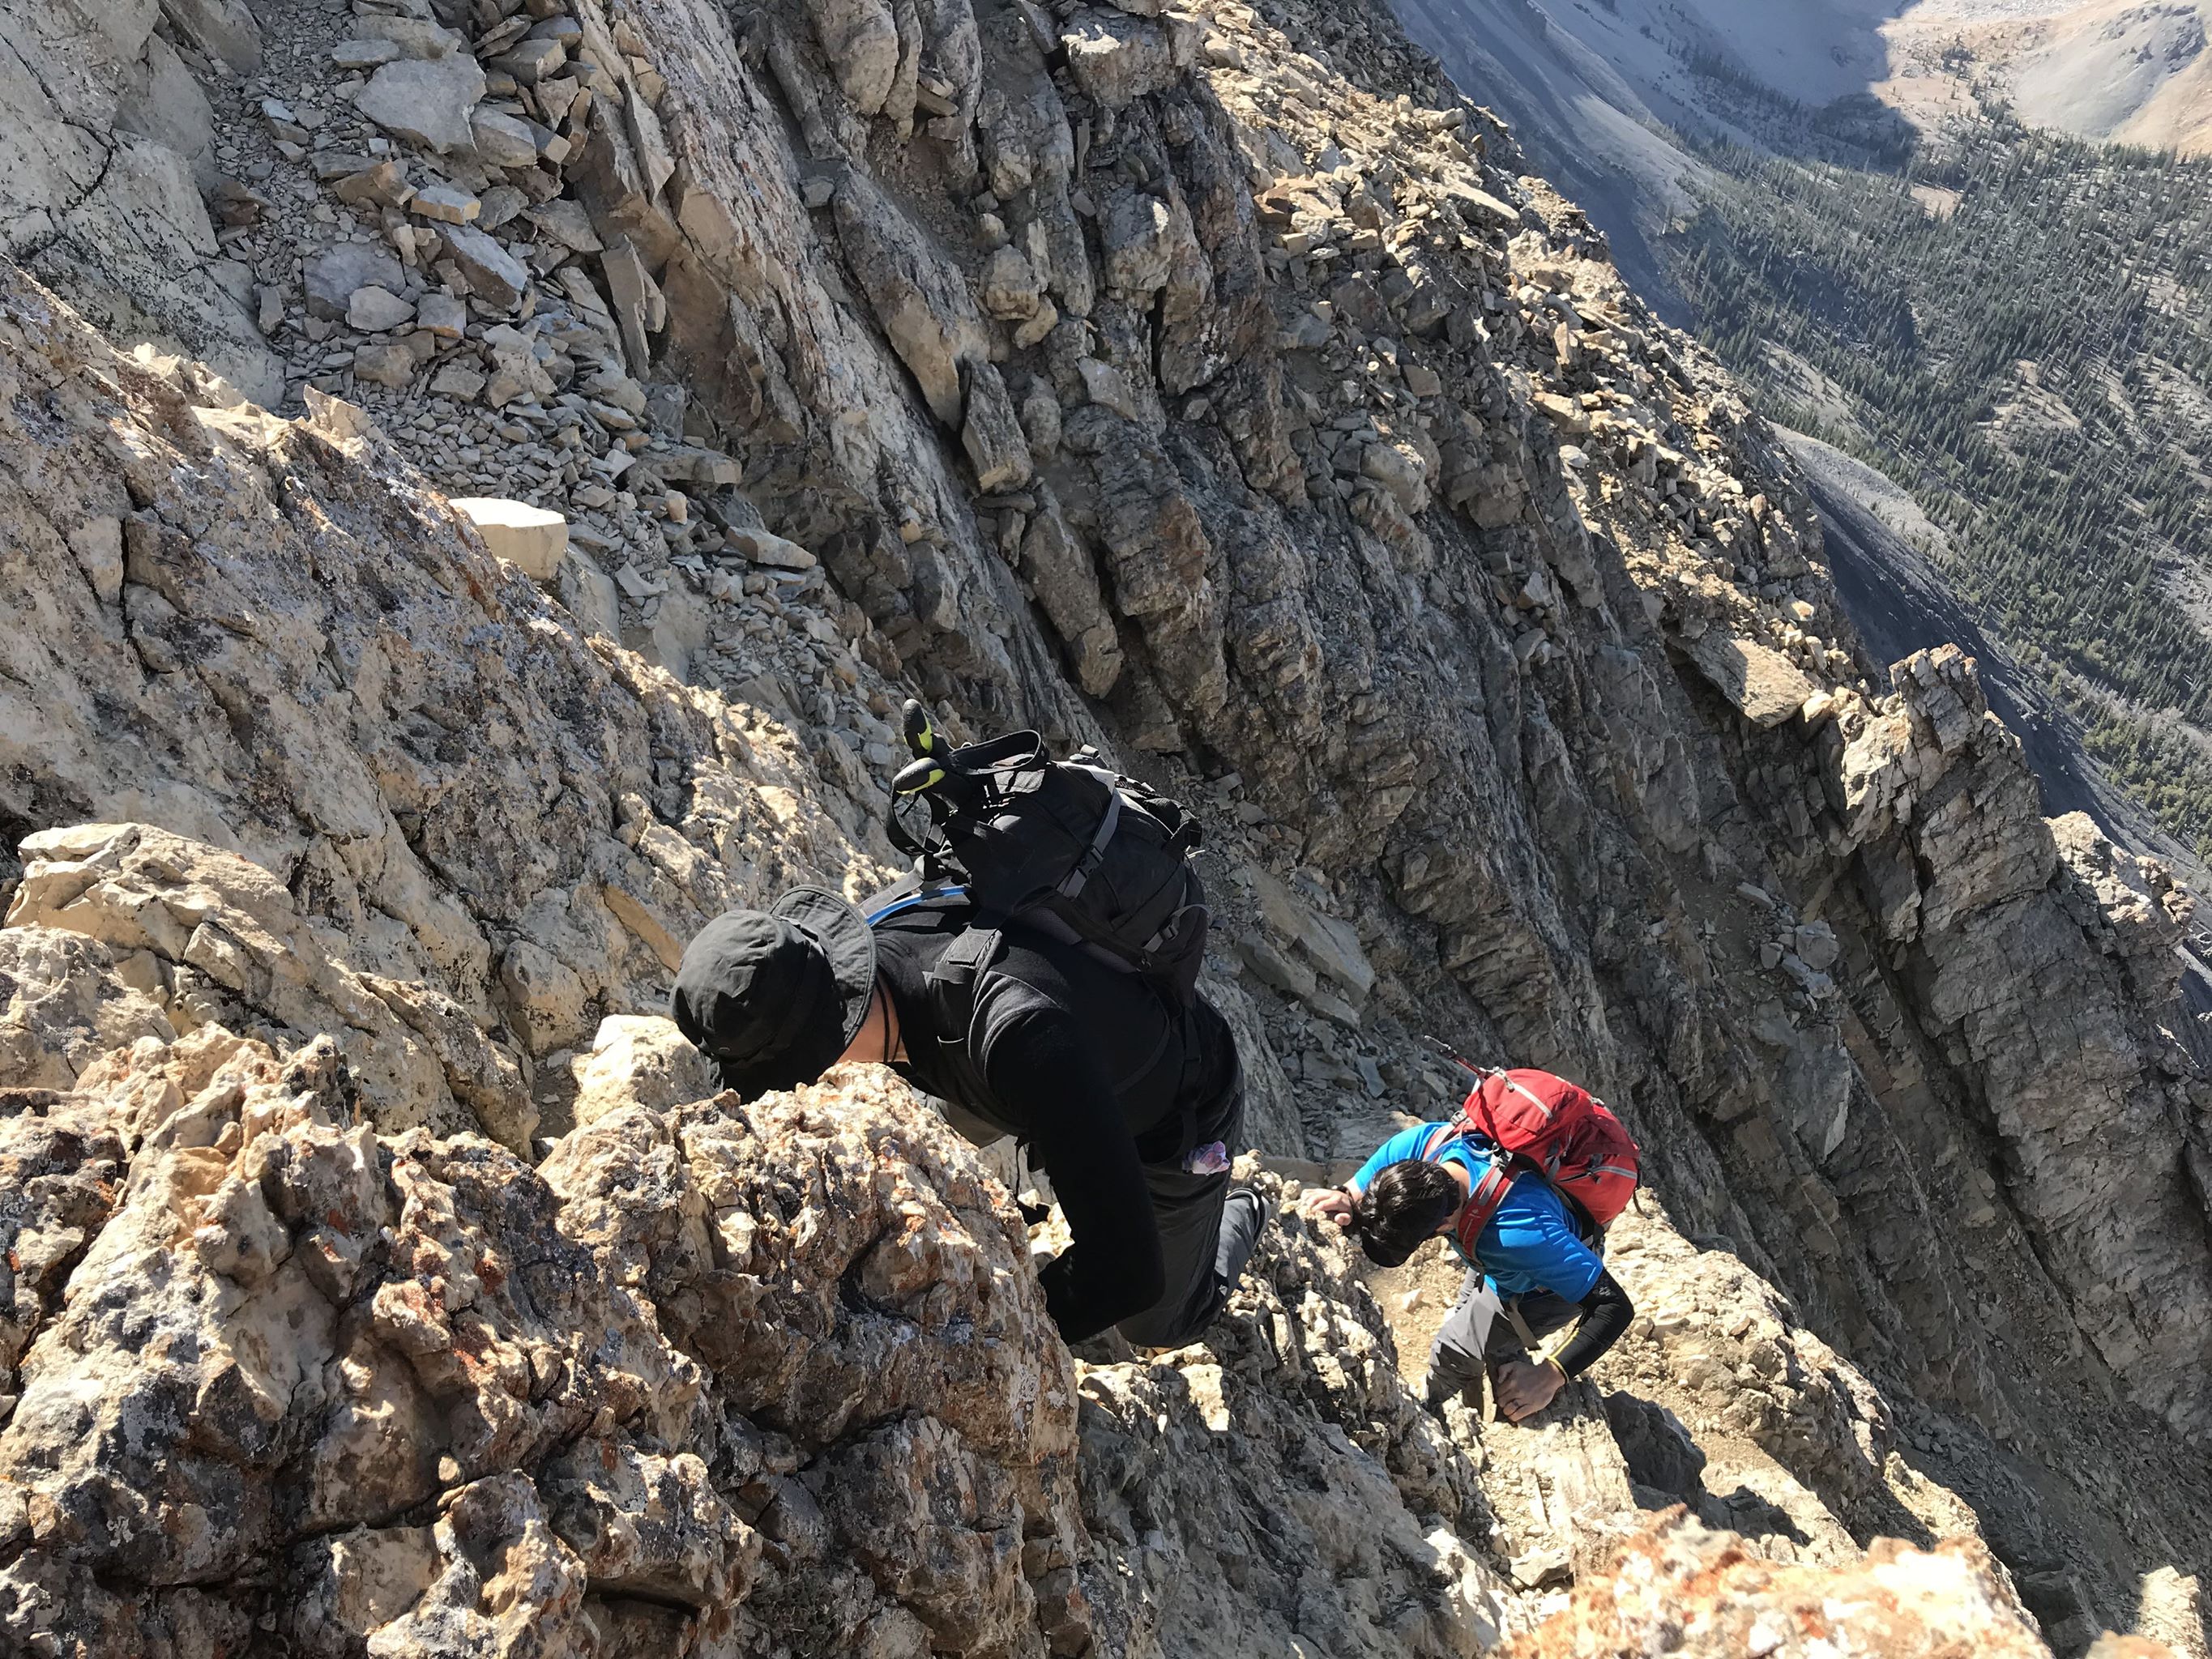
A short downclimb at the start of the first crux. Photo by Paul Lenhart.
-
The best option, which is only slightly longer than the direct approach, is to traverse away from the ridge to the right (Class 4), out of the notch, passing over two small chutes downhill to your right. This is very good rock with excellent handholds and footholds and only lasts about 15 horizontal feet before reaching stable, Class 3 rock. It’s heady, to be sure, but three solid points of contact are always available and it’s short-lived. In 2018, there was a nifty cairn at the far end of the traverse.
The very bad idea would be to try and descend either of the two chutes and scramble up loose, pitched rock to reach the Class 3 section. The angle here is steeper than it may initially seem and losing your footing in the gullies would be catastrophic. Ignore this option, take a deep breath, and make the moves to traverse over to the good rock.Once across, there are a bunch of cairns and a criss-cross of several worn social trails. The terrain eases from easy Class 3 to Class 2 here. You have two options: angle up left towards the ridge and bypass the ridge’s high point to the left, where the trail magically re-appears. Or, stay right, following a switchbacked semi-trail marked with cairns to a rock slot, where a short but easy section of Class 3 scrambling on solid rock brings you to the same place as the other option—the backside of the small highpoint on the ridge.
Past Crux 1, this is the right path that scrambles into the saddle to the right. The trail reappears here and connects to the White Gully.
- Here, amazingly, the trail fully materializes again, traversing the left side of the ridge on Class 2 and easy Class 3 terrain. This short section is a nice reprieve before the second—and more difficult—crux.
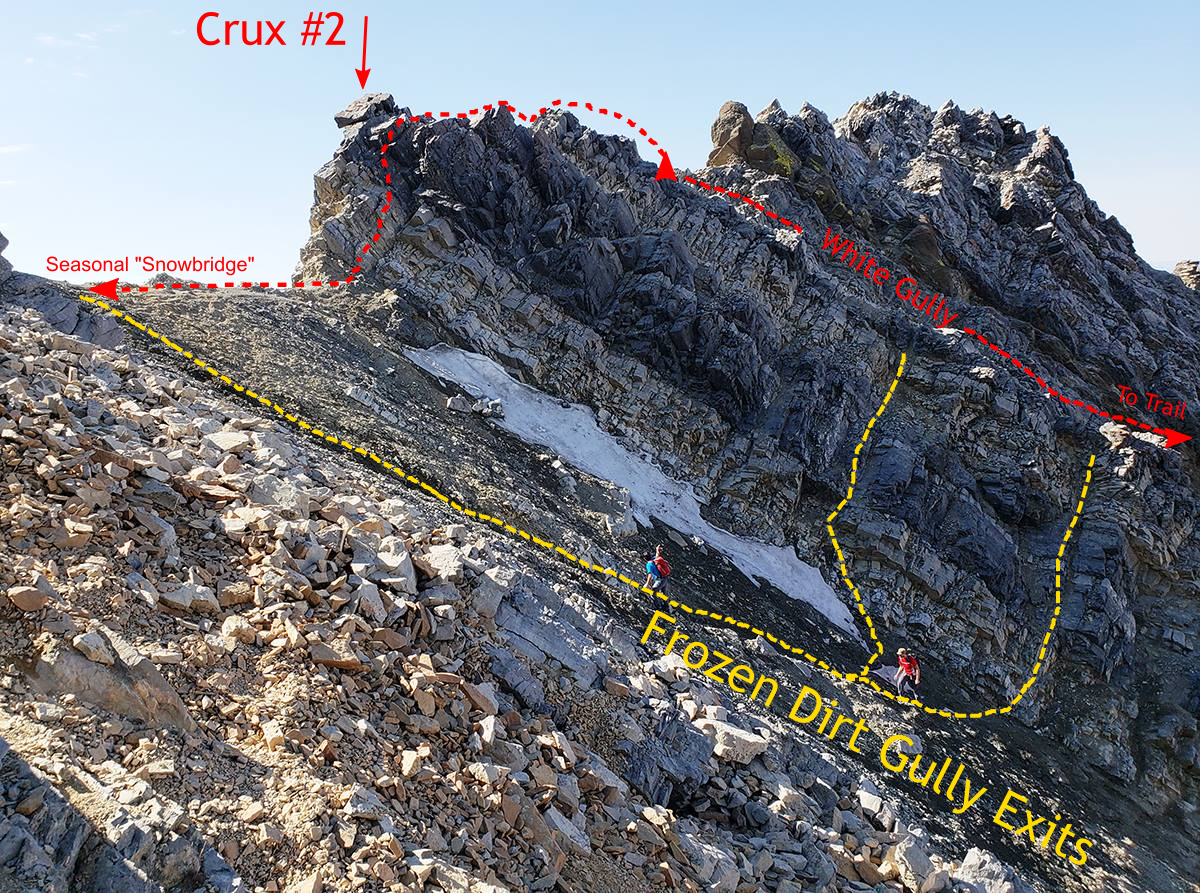
- 3.2 miles – The brief trail section once again disappears as you reach a small, micro-ridge running down from the ridge proper. This is the White Gully, a solid Class 3 section that is lightly exposed and heads directly up to the ridge. Once again, you have two good options and one potentially bad option. The best option is to downclimb the tower (described below). Second-best is sneaking out of the White Gully. Over the left edge (as you ascend) of the White Gully are several tricky, Class 3, downclimb lines into the broad, steep couloir we’ll call Frozen Dirt Gully. If it’s late summer / early autumn and there’s no snow, it’s possible to climb left out of the White Gully, descend into Frozen Dirt Gully, and scamper 4×4 style up the loose, steep gravel to a saddle on the ridge, thus bypassing the second crux. If there’s snow or ice (the bad option) in Frozen Dirt Gully, forget it—the fall potential from a slip is high. Skip it.
-
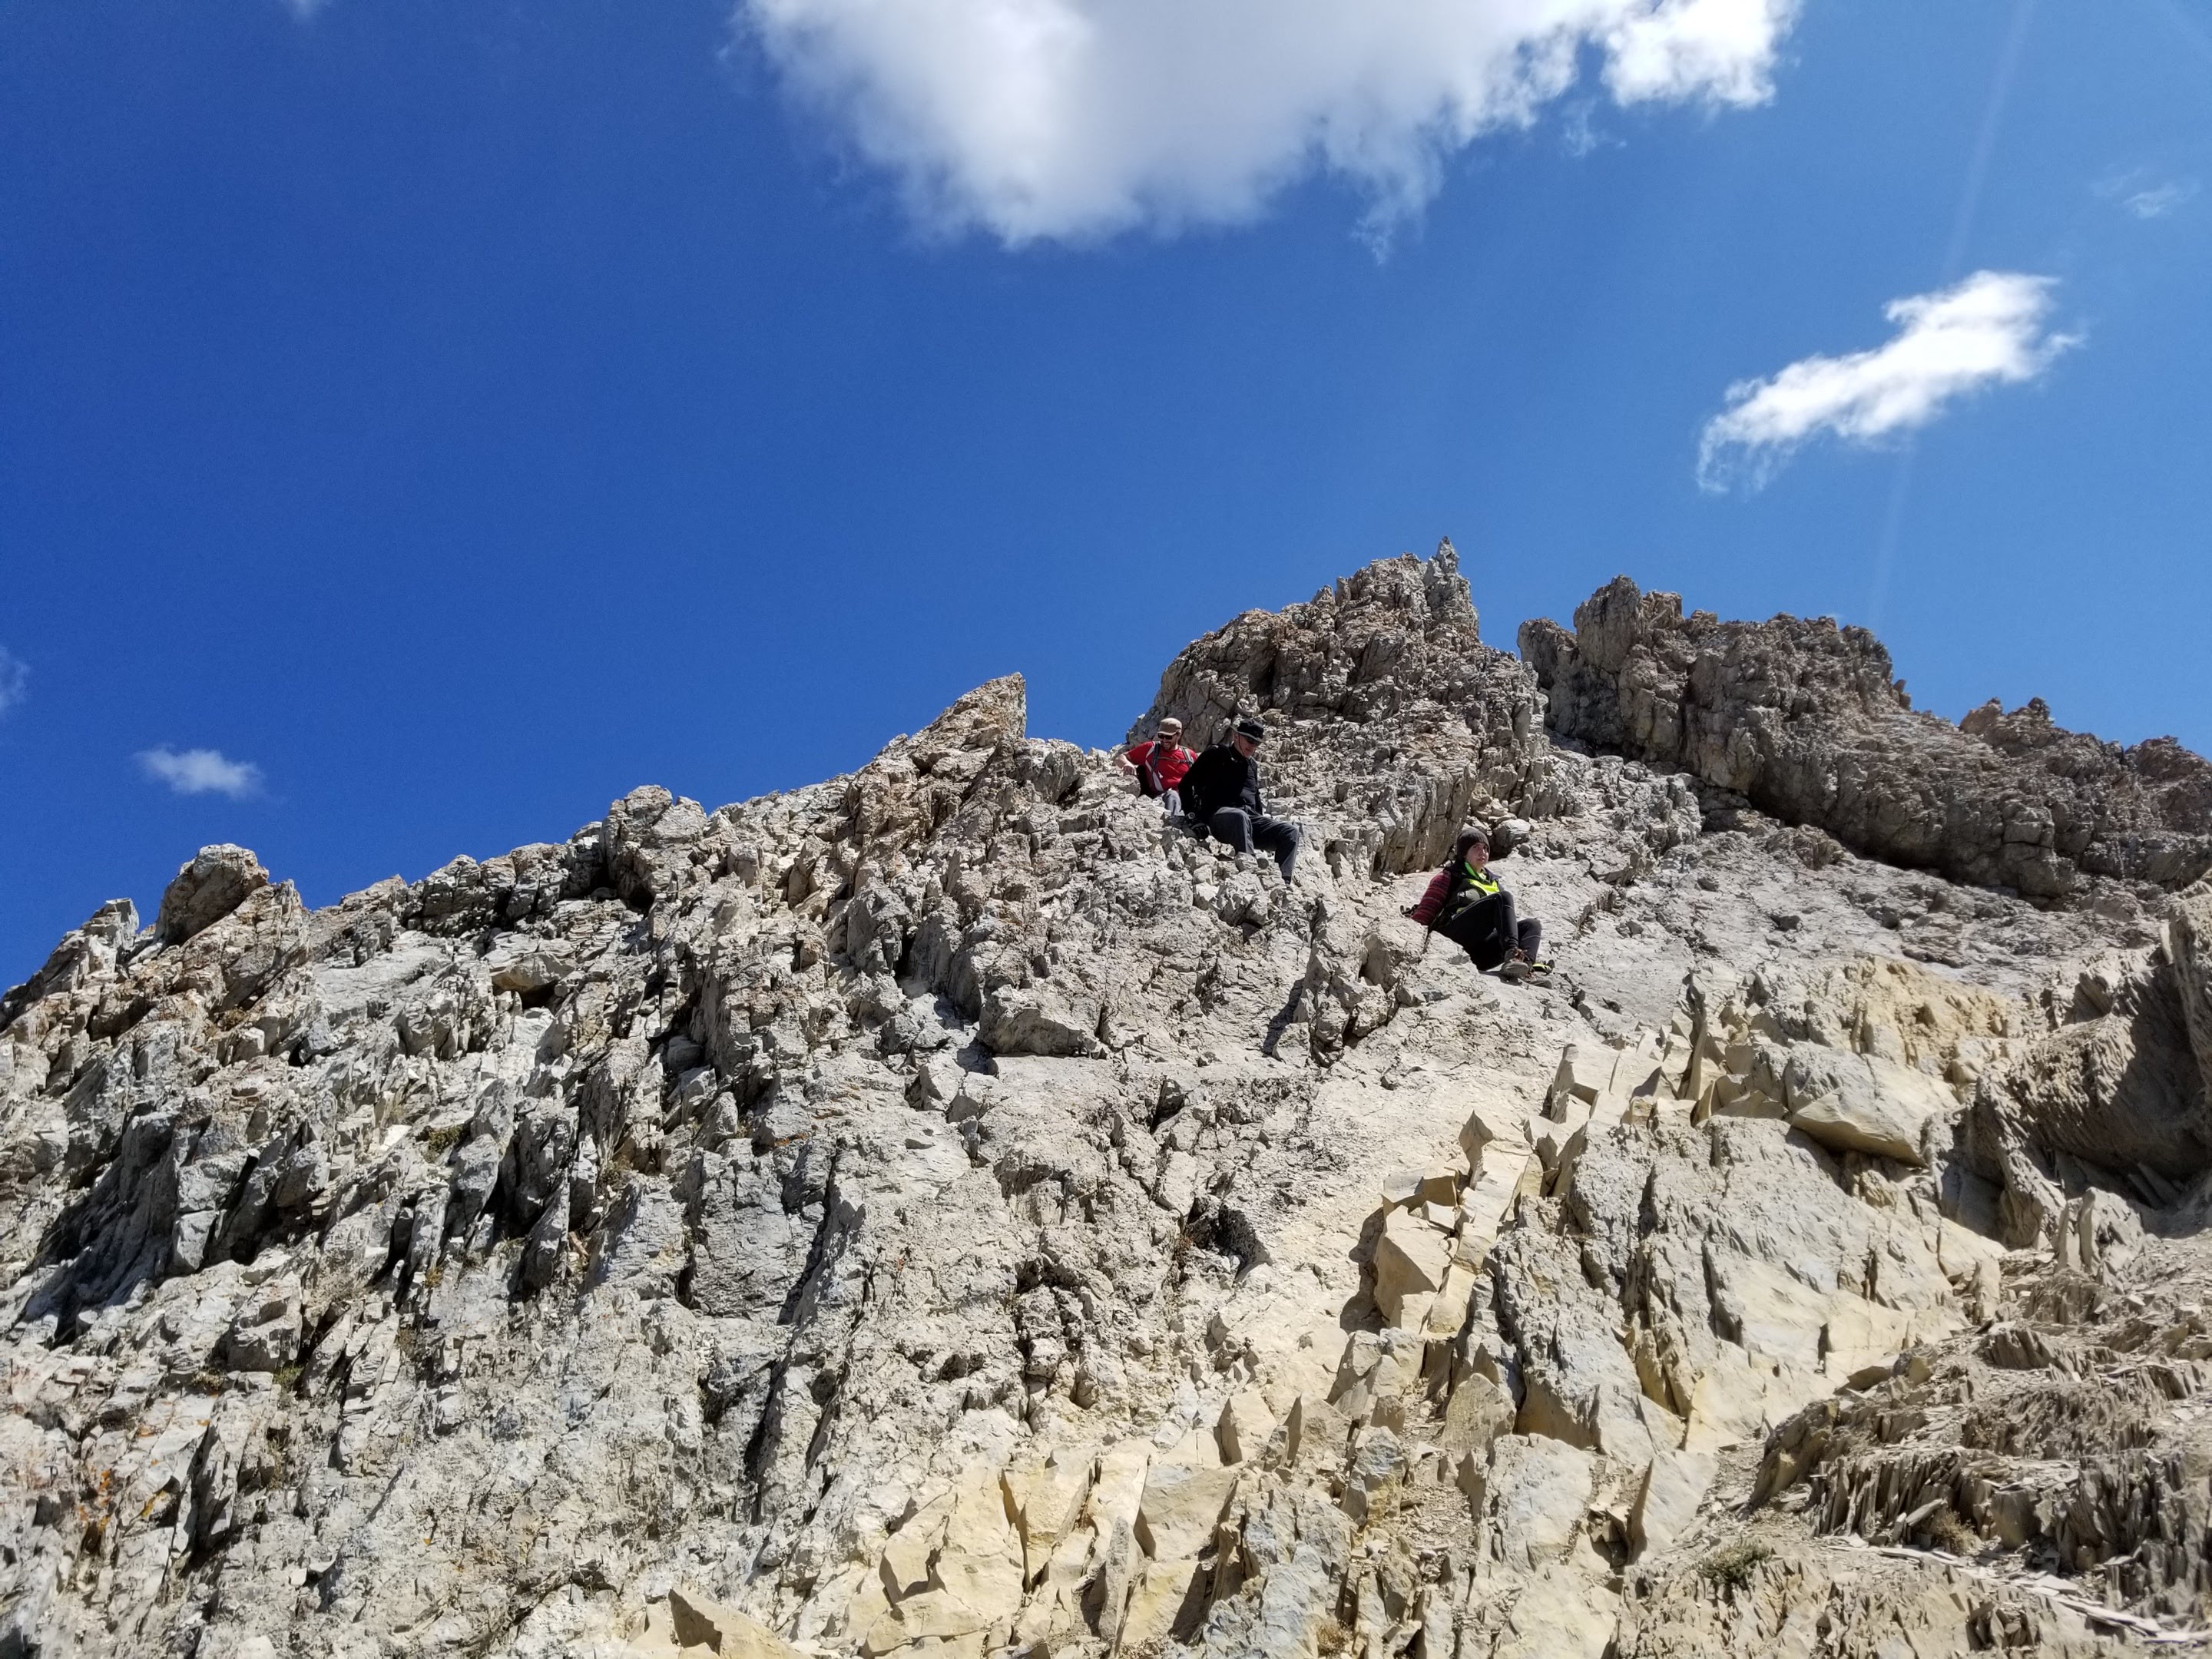
A good look back at Crux 2. The red line is the best way to go, though if you’re climbing in the late summer / early autumn, the yellow Frozen Dirt exits avoid the downclimb. When you return, stick to the crux / red route. Photo by Shaine Smith.
The best option is to top out on the ridge via the White Gully and go left to a high knob of rock that is the second crux—and another chance to chicken out! This 20-foot tall tower initially looks too steep to safely downclimb, but if you gather your courage and swing-out (face-in climbing) the handholds and footholds are bomber. This is the toughest move of the entire route, ascending or returning. It’s not unreasonable to call this an easy 5th-class downclimb, though 4th-class seems more accurate. If you brought ropes (a 30-meter, 9.0 mm rope is fine), setting up a quick belay increases your margin of safety. The first climber can spot the second if you’d rather not set up a full anchor, though if you do set up an anchor, you can leave the rope in place while you summit.
If you are climbing Borah late in the summer and this saddle is free of snow, congratulations—the technical portion of your ascent is over! If there is snow here, however, it’s advisable to bring crampons or at least solid microspikes to cross the so-called “snow bridge”, which is really just a snow field. When we climbed in early September it was totally melted out.However you cross this saddle, you’ll find an old friend waiting on the far side—the well-defined trail! This easy-going portion is merciful Class 2 and is another short-lived segment that will give you a chance to catch your breath. Odds are you’ve taken a glance at the last challenge guarding the summit: an imposing, cracked trail that splits the face of Borah Peak.
3.7 miles – At 11,750’, you’ve done a lot of work to reach the final approach saddle. This peaceful, flat reprieve is a great place to fuel up, hydrate, and get ready to turn your legs into hydraulic pistons for the summit push. You’ve already climbed 4,300 vertical feet and 900+ vertical feet in 0.3 miles (!) remain to top out.
The trail is surprisingly well-defined past the second crux. The toughest parts are done for now, but you still have a 900′ scramble ahead. Photo by Shaine Smith.
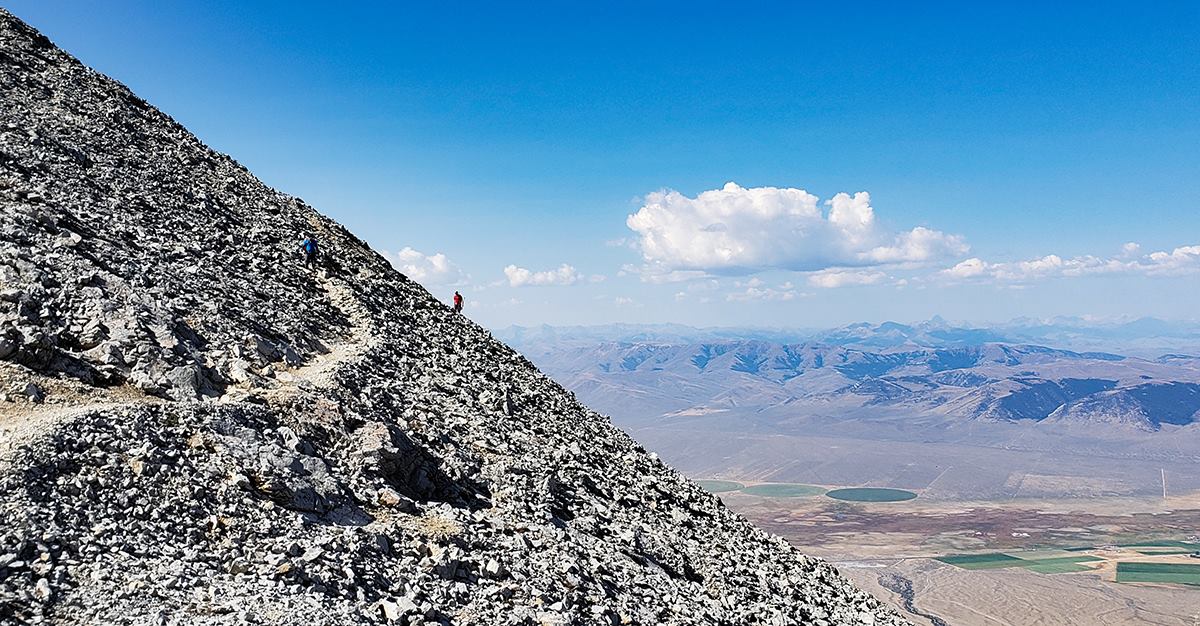
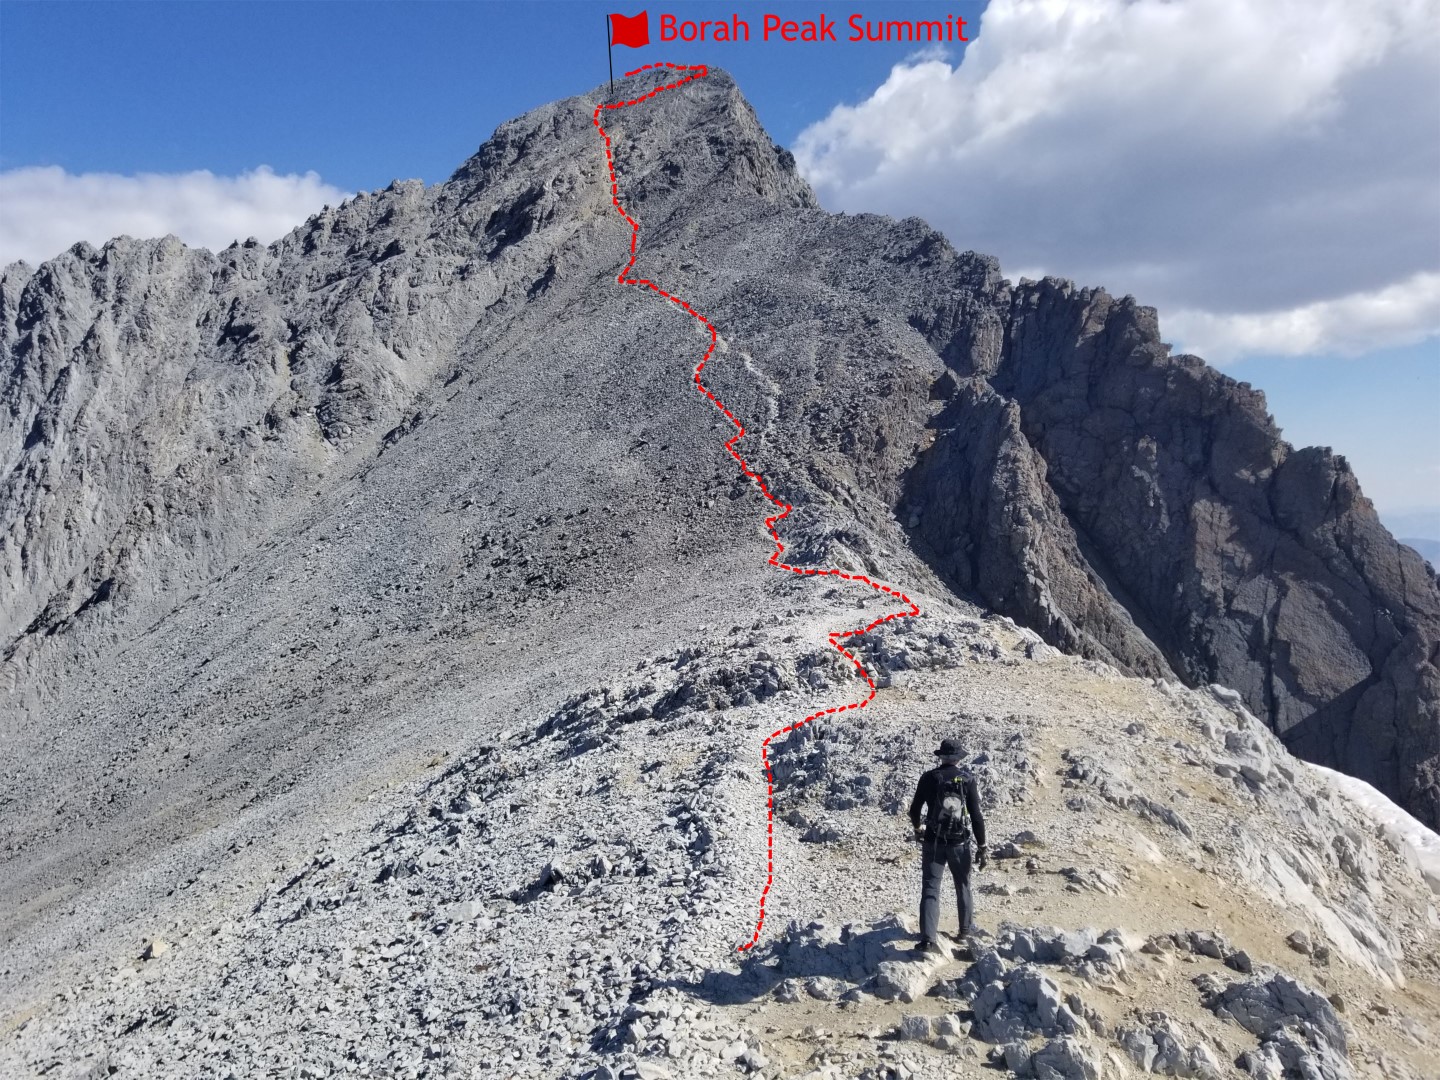
- As daunting as the final section looks, as you set off, the trail reveals itself to be much more manageable than it looked from afar. There are a few scattered cairns and the trail is mostly intact all the way to the top. A few steep, loose dirt sections (Class 2 scrambling) appear in the middle and may take your breath away for a few seconds. As you near the spot where blue sky and summit seem in reach, the trail discreetly switches back to the right, then left once it gains the ridge, giving way to easier terrain. Top out on this shoulder and a brief, glorious ridge walk brings you to your well-earned summit.
-
The final push to Borah Peak’s summit involves 900 vertical feet of gain in less than a half-mile on Class 2 scrambling terrain.
4.0 miles – 12,662’ the summit—you are now the highest person in Idaho! Views from the top are heart racing. Be aware of weather—you’ve likely been moving for 6 or more hours, but if clouds are building, don’t linger too long. You still have a lot of work to do.
The final, glorious push along Borah Peak’s summit ridge.
Enjoying a cold one on the summit of Borah Peak. Photo by Shaine Smith.
Descend the face back to the final approach saddle and follow it back to Crux 2. This time, don’t bother with Frozen Dirt Gully. Climb Crux 2 (it’s easier going up than down) and reach the White Gully. Scramble down (butt shuffling is acceptable) to rejoin the brief trail back towards the top of the ridge near Crux 1. You’ll notice that you can once again go left or right at the knob at the top of the ridge—right, along a short path, is the easier way but both ways bring you to the same approach of random cairns towards Crux 1.
On the descent, looking towards the trails on Chicken-Out Ridge.
- Make sure you are above the twin chutes (now on your left) when you make the final, gutsy, short traverse back into the notch that appends Chicken-Out Ridge with the approach trail. The holds are still excellent and it’s only about 15 horizontal feet to the notch. Once in the notch, easy Class 3 scrambling eventually leads you back to the trail. Once there, turn your vigilance radar down (but not off), break out your poles, and endure… er, enjoy… the long, steep walk back to the trailhead. You may be surprised how steep the terrain was that you chugged up in the morning.
Stay vigilant on the return, even after exiting the toughest part of Chicken-Out Ridge.
- At 8 miles, the gleaming vehicles of the parking lot appear, and you will have successfully climbed Borah Peak.
Post-Hike Ideas
By the time you finish Borah Peak, you will be one smelly human. A 1 hour and 45-minute ride will take you 88 miles to the cool mountain town of Stanley (Google Map here), a great place to get a room and grab a shower. Stanley is located in a valley in the heart of the Sawtooth Range, surrounded by towering mountain crags. There are several good dining options, gas stations, and stores — you know, civilized world stuff. Making a reservation ahead of time will guarantee a room and a good night’s sleep after a long day.
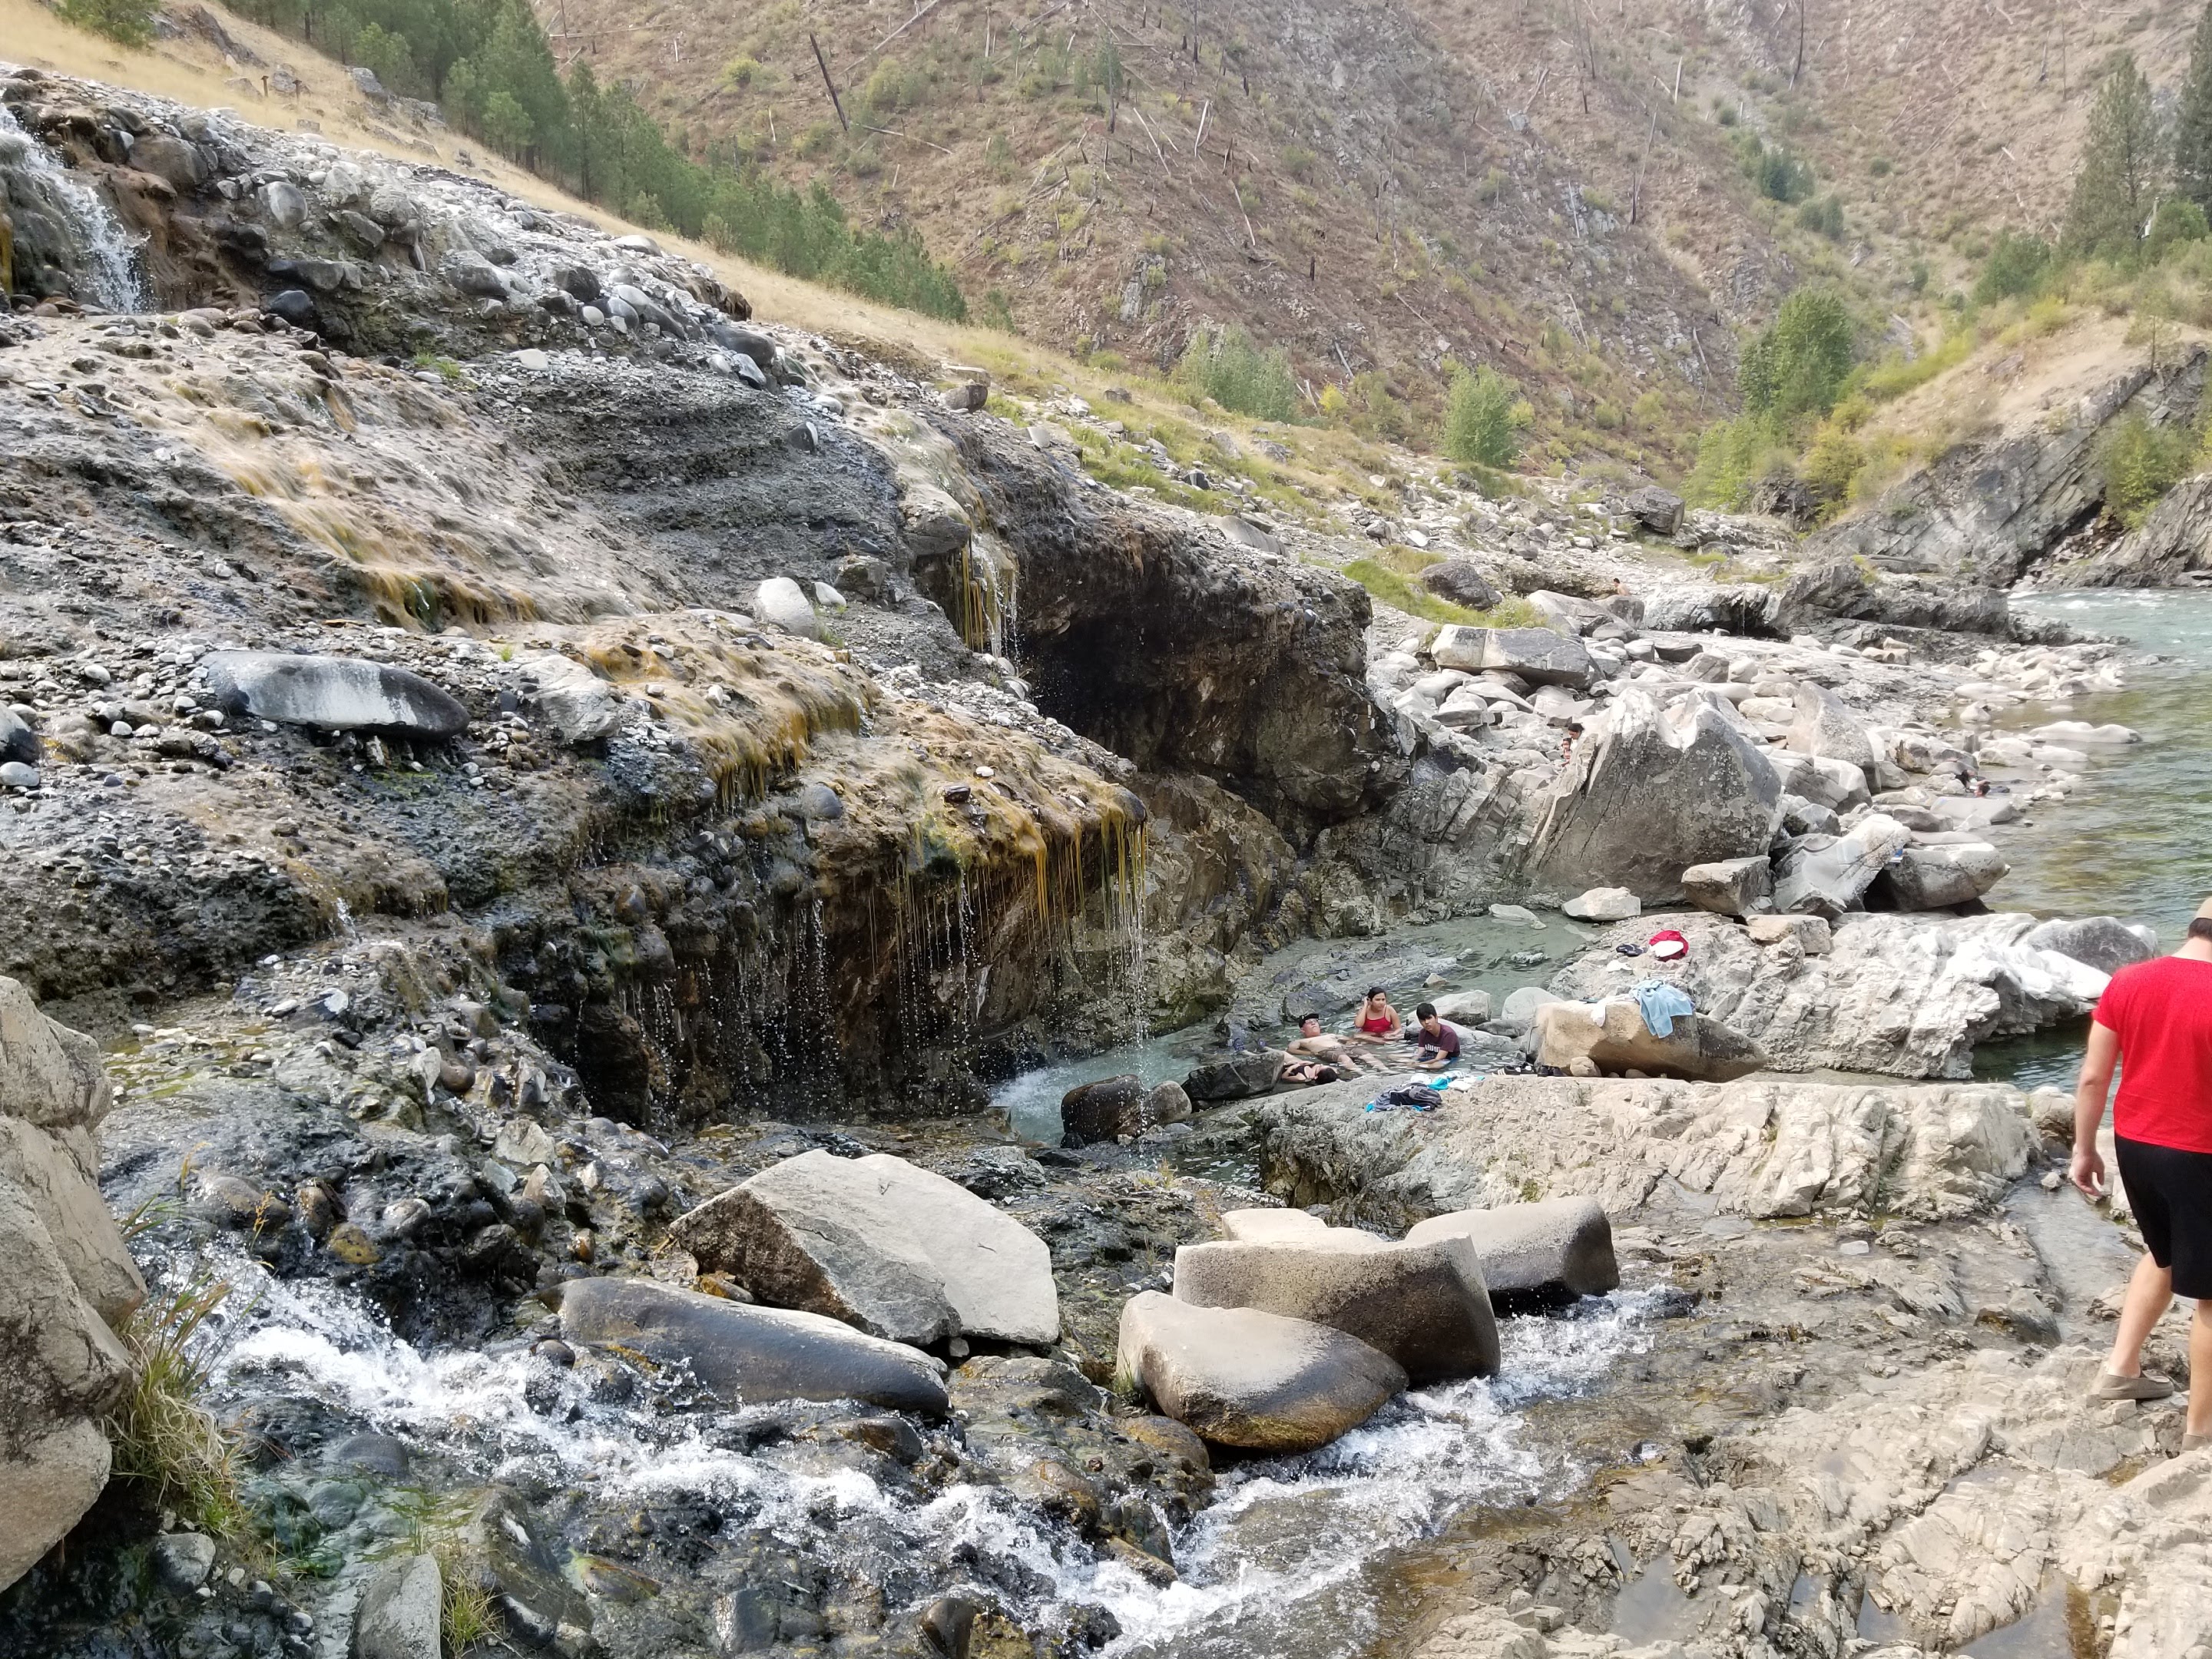
Kirkham Hot Springs, is a nice place to soak and celebrate.
The pools at Kirkham Hot Springs.
From Stanley, the loop back to Boise via Highway 21 is majestic and well worth the drive. The Kirkham Hot Springs and Campground features a natural hot spring right off the road, with several soaking pools formed from cascading, steamy springs. You’ll pass the quaint town of Idaho City and Arrowrock Reservoir before reconnecting back in Boise, where it all began.
Final Thoughts
Researching Borah Peak was tricky. Sources couldn’t even agree if it was called “Mount Borah” or “Borah Peak” (the USGS designation is “Borah Peak” for what that is worth). For some climbers, it was reported as the boldest ascent they’d ever undertaken. For others, it was a walk in the park. The truth is somewhere in between. You’ll need legit fitness to reach the summit in good style. I spend a lot of time scrambling on Class 4 terrain and wasn’t terribly fazed by Crux 1, but Crux 2 definitely got my attention. The Chicken-Out factor is high, as both cruxes look extra spicy when first encountered. Take your time assessing the best line and proceed with confidence.
This was my 38th state highpoint and truly one of my absolute favorites. After a near-summit to Montana a few years back, Idaho seemed like a mere consolation prize. In fact, it’s a fantastic mountain and may even be a harder day hike than Mount Hood. It’s also one of the state highpoints I would love to revisit now that I know the route. Good luck on your quest to reach this impressive mountaintop—I hope this guide is helpful.
Farewell Borah Peak, until we meet again.