Last Updated on February 8, 2024 by James Dziezynski
“I told my dentist my teeth are going yellow. He told me to wear a brown tie.”
~Rodney Dangerfield
(Warning: there’s some real chemistry here, so make sure to use the appropriate protection when goofing around with potentially dangerous recipes you find on the Internet. Or in other words, if you go blind trying to shine up your Sega Dreamcast, it’s your own fault!)
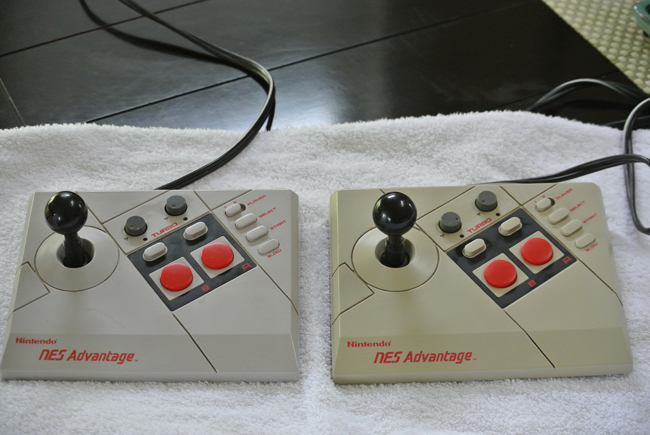
The controller on the left is my original and un-yellowed NES Advantage (the control group — ha-ha, get it?) On the right is a poor, yellowed Advantage.
If you mention to people you’re using open-source chemistry found on the Internet, most will (rightly) assume you’ve opened up your own meth lab. The exception may be when the aforementioned person is a fan of classic video gaming. In that case, they may be snapping on their rubber gloves and donning their finest protective eyewear to concoct retr0bright. Retr0bright sounds like it may add sparkle to your smile—and it very well might—but as far as gaming goes, its purpose is to clean up the yellowed plastic elements of old electronics.
Old Yeller
The 1980s were a halcyon period for home computing. Systems such as the Commodore 64, the Apple IIe and even the humble Nintendo Entertainment System bring nerds back to a kinder, gentler time when DOS ruled the world and the hero of your favorite video game was likely an animated block. But Father Time is relentless as a hungry cat that won’t stop meowing at your door while you’re trying to write a retr0bright article. He has blighted many hearty electronics cases with an ugly, asparagus-pee yellow hue that often belies the hearty (and still functional) circuitry within. In a baffling display of randomness, certain models of the exact same system might remain immune to discoloration while others would look like they’ve been left at the bottom of a swamp for decades.
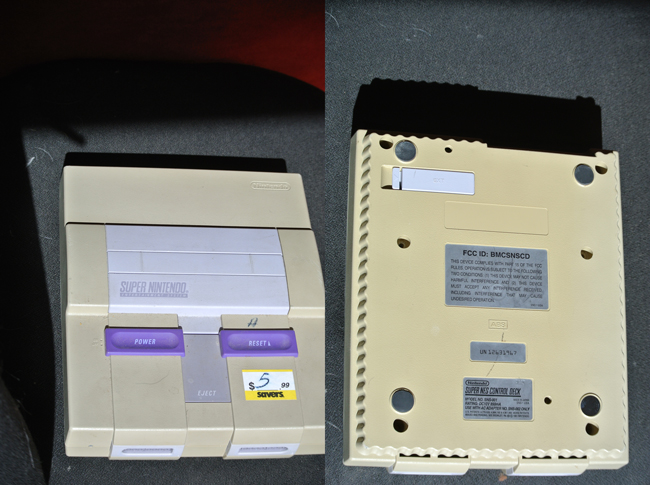
This sad SNES was left for dead and has dog hair on it for extra pathetic-ness. Even the bottom yellowed. The game port on the top and the “EXT” tab on the bottom show the color the console is supposed to be.
Yellowed systems were a double-edged sword with +3 wisdom and -3 charm. Although many of these old-time consoles and keyboards functioned just fine, their cosmetic deficiencies allowed collectors to acquire them cheaply. However, trying to remove the yellow turned out to be a sticky wicket. The obvious clean-up attempts—think “You’ve tried scrubbing it out…” here—all resulted in marginal and occasionally disastrous results. Plastic, unlike human teeth, does not bleach well. Even if there was a slight change in hue, the harsh chemical reaction left plastic brittle and wimpy. Elbow-greased-powered soap and water was a lesson in futility as the ugly yellow would mock even the mightiest of scubbings. Everything from toothpaste to turpentine was employed in an attempt to un-yellow plastic, and they all failed.
But we nerds are a relentless group and we tend to have a lot of evenings open so it was only a matter of time before some really smart guys were able to crack the mystery of the yellowed electronics.
Chemistry 101 or Why Does it Look Like Someone Peed on my Super Nintendo?
Many famous scientists, from Bill Nye to Dr. Bunsen Honeydew, have said for years that chemistry is pretty neat, and it turns out they were right, at least when it comes to classic gaming systems. What follows is a VERY basic explanation of why certain plastics turn yellow (for a more detailed account, check out the retr0bright site).
Affordable, durable plastics are a complicated science, but here’s a simple overview: a large majority of computers and game systems made in the 1980s used ABS plastics (acrylonitrile butadiene styrene) due to their low cost and sturdy constitution. At the time, ABS mixtures had a quirky characteristic in that whenever the prime ingredients were mixed; they tended to bond differently from batch to batch. You ended up with the same product but not always with the same structure (this is similar to the way human DNA binds and why you may not look anything like your sibling despite being made of the same “ingredients”). As a result, some moldings made of the exact same material have resisted yellowing while others began to fade in only a few short years.
Despite the differences in chemical make-up, ABS plastics of all blends would never yellow if nothing was added to them. The downside of this is they would also burst into flames at the slightest exposure to heat, so something has to be added to make plastics fireproof. Enter the main culprit at the heart of our yellowing dilemma, the unstable element bromine. Bromine is a brownish chemical that easily blends into ABS mixtures and renders it flame retardant. The problem with bromine is that bonds rather loosely to its partner elements. In certain ABS mixtures, the bromine remains relatively stable and in-check. Modern plastics have solved this problem by chemically stabilizing bromine in their mixtures. But in the 1980s the science was still incomplete and with it came risk that bromine molecules could go rogue.
When bromine is exposed to UV light, it gets excited. Like any good molecule looking for a good time and in a state of excitement, it has the tendency to vibrate away from its stabilizing element (in this case, hydrogen) and seeks out a new life in the big, periodical chart city. Bromine is prone to the same bad behavior as your buddy who ends up marrying that crazy chick he should have never hooked up with in the first place. Bromine readily bonds with oxygen, a semi-reliable partner that is never as stable as the good ol’ days of hydrogen. Once locked in with oxygen, bromine has a difficult time escaping and even when it does, a new hydrogen molecule can be tough to find and thus it is prone to re-bonding with another oxygen molecule. The more bromine fuses with oxygen and away from hydrogen, the more the brownish tint emerges, resulting in yellowed plastic (it would eventually turn completely brown if left alone for another decade or so).
Before you blame UV light for being the catalyst that ruins the beautiful hydrogen-bromine marriage, it turns out that this same UV is going to be the hero of our story. Remember that UV excites bromine in a way like no other wavelength of light can. On a microscopic level, UV vibrates a bromine molecule until it breaks free so the trick here is to have a readily available source of hydrogen molecules for bromine to latch onto. This stabilizes the hydrogen, the bromine and the oxygen and the upshot is your smokers’ teeth yellow Nintendo reverts back to its beautiful original color.
There’s one last problem with this equation, namely that hydrogen on its own tends not to want to be associated with a low-life like bromine. Add to that, hydrogen is a willing partner with oxygen so there needs to be a way to “activate” a hydrogen-oxygen solution to break apart the bond, releasing oxygen and setting up single molecules of hydrogen ready to latch on to bromine.
Chemicals to the rescue!
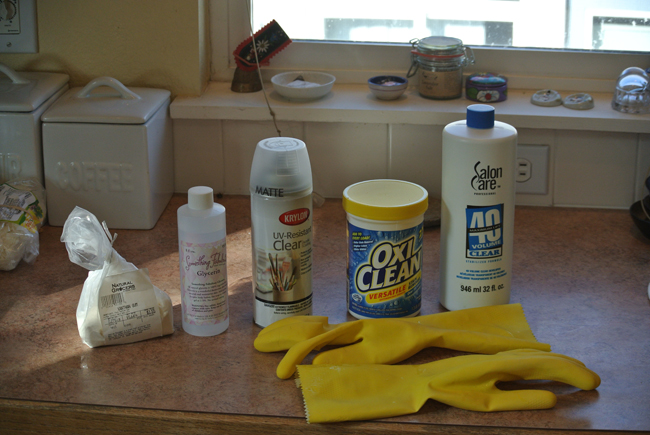
Hunting Down the Ingredients
The dudes who eventually solved the yellowing mystery did the community a great service by finding every day, perfectly legal ingredients to create the gel-based solution known as retr0bright. Again, for more details and options, please visit the retr0bright open-source web site. Here’s what I used:
-
- 10% – 12% Hydrogen peroxide solution. This provides the base elements to be broken apart into hydrogen and oxygen. Note that anything above 12% can be difficult to find and doesn’t really affect the process enough to risk the added danger of burning the skin. Normal grocery store hydrogen peroxide is 3%, a little weak for our methods. I was able to acquire my solution at Sally’s Beauty Supply (boy, were they shocked when a bearded dude walked in). Many beauty supplies carry 10% hydrogen peroxide. I got a 32 oz. bottle called Salon Care 40 Clear for $4.99. Make sure it’s not a cream blend, as certain additional chemicals will mess up the process.
-
- Xanthan Gum. This ubiquitous food additive can be found in powdered form at any health food store and it’s cheap. I got a small bag at Whole Foods for $1.55, which was MORE than enough for many batches of retr0bright. It is used to turn the hydrogen peroxide into a gel to more easily coat your yellowed plastics.
-
- Glycerin. Not the stuff they make bombs with, the stuff they make soap with. This was a tough one to track down but it turns out many hobby / craft stores have glycerin for weirdos people who like to make their own soap. I got a 12 oz. bottle for $3.99 at Michael’s Arts & Crafts. This is used to make the gel moist and prevent it from drying out under UV light.
-
- Oxy-based cleaning powder. Sold under brand names like Oxy-clean, this is an easy to find ingredient most often sold as a stain remover in the laundry detergent isle. I got Oxy-clean for $4.99 and again, it was way more than I needed. This is used to activate the breakdown in your hydrogen peroxide and should only be added when you are ready to apply the gel.
-
- Cheap-o paintbrush. To apply then reapply your retr0bright solution.
-
- Eye protection and rubber gloves. Retr0bright isn’t going to sizzle through your skin but it can cause irritation if left on exposed flesh for too long. More importantly, don’t get this stuff ANYWHERE near your eyes, it has the potential to blind. Seriously, goggle up when using this stuff.
-
- Blender. To blend all these goodies together. Don’t worry, it won’t ruin the blender but you will need to thoroughly wash it when you are done.
-
- Clear UV coat spray. I used a matte, clear UV spray I got at Michael’s crafts for $3.99. To be used when the yellow is gone to prevent re-yellowing by blocking UV light. (The spray is perfectly clear and unnoticeable).
- UV light source. Our final “ingredient”, I was lucky enough to have an AeroGarden in my house but you can use good old sunlight. Those bright, garish fluorescent lights found in long tubes are a good source of UV, much better than black light bulbs, which only emit a small amount of UV light (but would still work, they just take longer). I put my components in a foil lined box to help amplify maximum exposure.
Here’s the exact process taken from the retr0bright website:
Merlin’s Original Recipe
The original magical “Retr0bright” gel mixture that was found to work is:-
1 pint (500ml) Hydrogen Peroxide, 10 to 15% strength (40 vol) (available from hairdressers’ supplies, e.g. the ‘Sally Beauty’ franchise in the UK)
2 heaped tablespoonfuls of Xanthan Gum (available from health food shops or online)
1 level teaspoonful of Glycerine (available from pharmacies)
1/4 teaspoonful of “Oxy” laundry booster
Add the Hydrogen Peroxide and Xanthan Gum to the blender or liquidiser. Mix on high speed for 5 seconds. Add the Glycerine and mix for a further 5 seconds. Let the mixture rest for a minute then mix again for 5 seconds. A smooth, non-drip gel should have formed. This gel can be put into a dark coloured jar or tub (e.g. a coffee jar covered in tape) and stored, as long as you DON’T add the “Oxy” until you are ready to use it.
To ensure the best results, you are advised to wash the parts first, to remove any polishes or other deposits that may lead to patchy results. For example, put your parts through a dishwasher on a cool cycle.
Just before you paint the gel onto the parts, add ¼ teaspoonful of any “Oxy” type laundry booster and stir it in thoroughly, and then put the parts under a UV lamp or out in the sun.
A day or so later, your parts should be as good as new, wash the gel off and that’s it! It may take another treatment for the worst yellowing to be reversed but in all cases it will eventually be successful. To permanently prevent the yellowing from returning, just coat the parts with a clear acrylic varnish. Alternatively, you could use a protective polish such as Armor-All or Autoglym to provide a UV protectant to the surface.
The Laboratory at Work
I had two test subjects to work with. Both had been acquired dirt cheap thanks to their yellow veneer. The first subject was a working, slightly yellowed NES Advantage controller I had picked up for 99 cents at a yard sale here in Boulder, Colorado.
My second subject was in worse shape: a horribly yellowed SNES system I got at Saver’s thrift store for $2.99. The price tag was originally $5.99, but when I asked the clerk if the system actually worked, she just replied, “Uhhh, ok. $2.99”. This thing was a mess and it didn’t work, so the damage was beyond cosmetic but since I like to tinker with these things, I figured someday I’d be able to bring ‘er back to life.
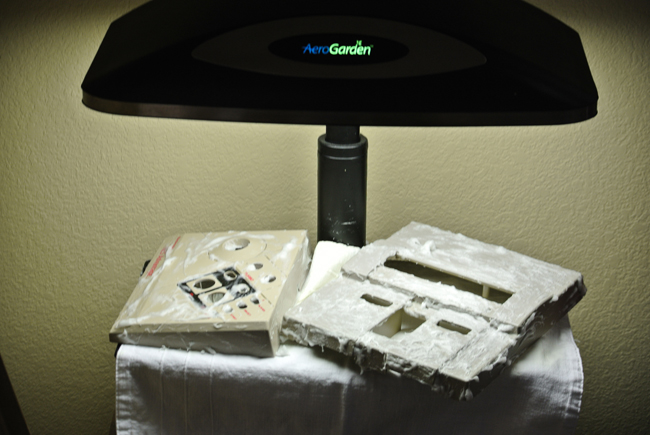
Icky but effective: the first round of retr0bright under the UV lights.
I dissembled both the Advantage and the SNES (there’s easy-to-find tutorials on the web for taking apart both) and whipped up a mixture of retr0bright. I coated the plastic with the gel and set them under my UV lights over the course of 3 -4 days, leaving them exposed about 8 hours a day. You could also just leave them outside on a bright, sunny day for the same results. I would recoat the systems with a thin layer of retr0bright every 2 hours or when it looked like it was starting to form a dry skin on the plastic (be warned, the mixture is kind of a funky, snot-like gel that looks a lot more like another bodily fluid that is not snot). I would leave a coat on overnight, then completely rinse off the plastic in the morning, using rubber gloves and warm faucet water. Then I would repeat the process as needed. Be careful not to put the solution on too thickly or let it totally dry out as this may cause the “white blooms” mentioned on the retr0bright site – places where the plastic actually was overexposed. I had a few subtle bloom spots on my SNES but truth be told, they are very subtle and certainly look better than the yellow blotches.
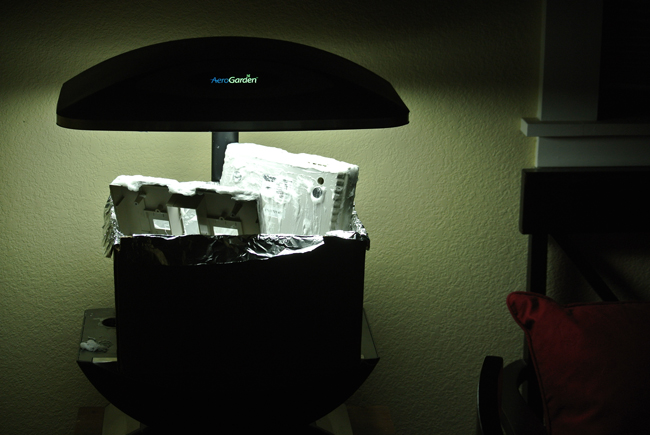
Now in a foil box for a more bromine-reassigning UV action!
Note that storing your retr0bright in a light-proof container is vital. I wrapped some old pickle jars in foil but you can use any light-proof container. Because you will probably make more retr0bright than you need, you can store some away for future use – just make sure not to add the Oxy-clean until you are ready. I used about ¼ teaspoon of Oxy-clean with about 1/3 of the total retr0bright solution that Merlin’s recipe makes and stored it in a light-proof container. Once added, the Oxy-clean will cause the activated solution to gradually foam up. I used this solution over a 24-hour period to recoat the plastic and it seemed to still be effective, though I’m not 100% certain you could leave the Oxy-clean activated solution too long (48 hours?) before it would be ineffective under the UV light.
Eureka! The Results
After three full days exposing the Advantage and four full days with the more deeply yellowed SNES, I was amazed to see that this stuff actually worked! The Advantage looked better than new and really cleaned up nicely. (It’s interesting to note that any other marks, dirt, marker, etc. will NOT clean up with retr0bright; it is working on a specific molecular issue. I simply used Mr. Clean Magic Eraser to erase a few marker lines after I was done retr0brighting.)
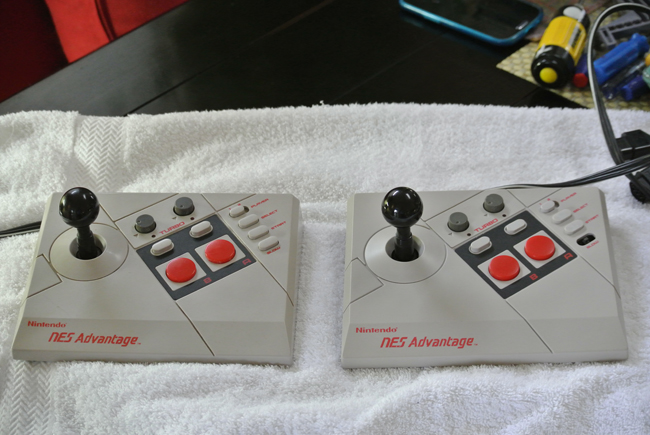
Wow, the “old” Advantage looks better than the original! It took me a while to find the missing “slow motion” button but eventually I did.
The SNES results were even more impressive. I probably could have gotten it to look perfectly new with a few more rounds, but I was happy with the results (they matched my other SNES unit that had not yellowed). The SNES has a natural purplish color thanks to a small amount of blue pigment added to the plastic blend. I wasn’t sure if it would revert to the original color but it ended up pretty darn close. It’s interesting that the INSIDE of the case was also yellow despite having never been exposed to direct UV. This is because the chemical reaction “reverberates” through the plastic and can excite bromine molecules not in the affected area.
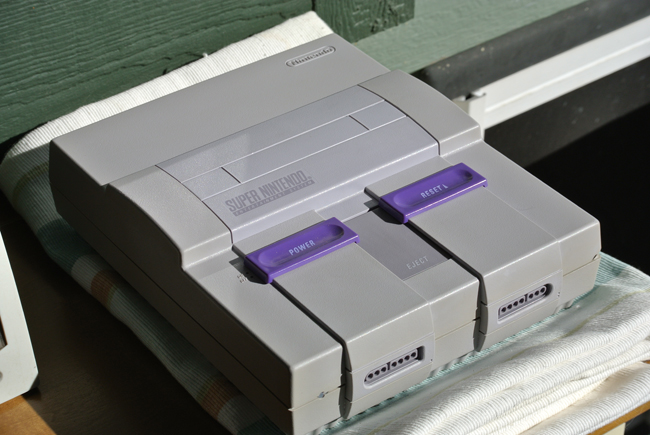
Wow! This is the same ugly SNES in the previous photo. She cleans up nicely, wouldn’t you say?
The reassembled Advantage worked like a champ and looks great! As for the old SNES, I was able to order a replacement motherboard from Diamond Life Sales. Because the motherboard was made for newer SNES systems, I had to sand down a superfluous plastic post inside the case to have the new motherboard fit. I also removed the lower RF shield. This can be relatively easily modified using a Dremmel tool to fit the new motherboard. I put it all back together and like a Phoenix rising from the 16-bit ashes, the once forsaken SNES came back to life, ready to play Super Metroid and countless other classics.
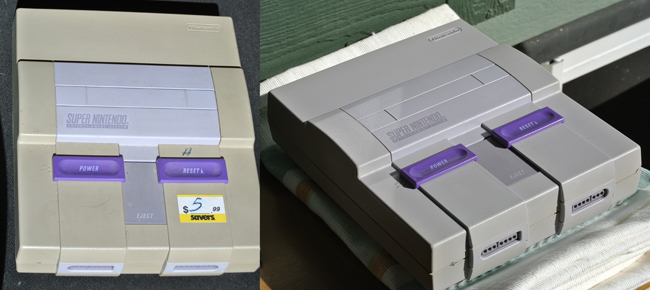
The dramatic before and after. I tried to use the same light and didn’t use any photoshop filters but hey, I’m not Ansel Adams.
The bottom line: retr0bright works and it was a fun and inexpensive project to undertake (the most expensive thing was the replacement motherboard for the SNES, which had nothing to do with the yellowing). Plus, I was probably the only person in Boulder who bought a bunch of chemicals and a plant-based UV light growing system that wasn’t doing anything illegal. I learned a little chemistry, how to tidy up some old systems and in the end, maybe a little about love. Ok, the last part probably isn’t true. But at least my passion for classic gaming will go on in style, thanks to my unsullied, retr0bright renovated ABS plastic.